nmap os detection原理及golang實現
近期對nmap的操作系統識別功能造了個輪子,用golang實現了一遍,想未來能用于掃描器,資產發現/管理系統,網絡空間引擎中。本文記錄一些原理和踩過的坑。
造輪子也是一次深入理解它原理的過程,造完輪子后感覺到所有代碼盡在我掌握之中,之后大規模掃描測試就可以 以最有效率,發最小包,繞過防火墻的方式進行集成,也能輕易的進行擴展。
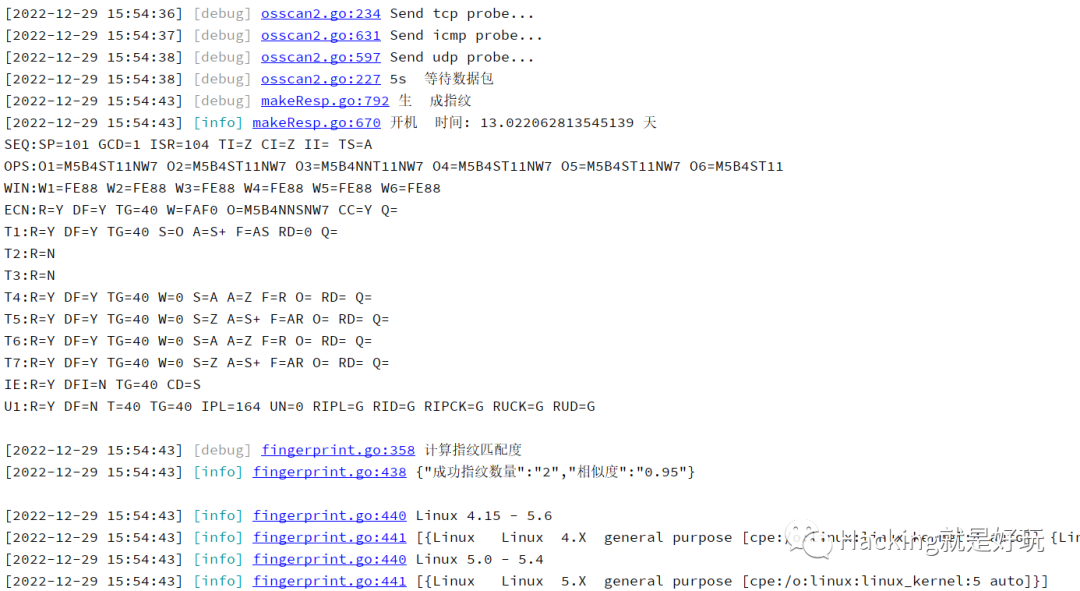
成果圖,實現了對一個主機在5s內能夠識別出其操作系統,能預測開機時間(部分系統有誤差),用無狀態掃描技術去識別大量主機的操作系統時,平均時間會更低。
造輪子其實是非常不容易的,雖然nmap是開源項目,但與操作系統識別有關的代碼就超過6000行,nmap官網有文檔專門有一節講述了nmap操作系統指紋的技術實現 https://nmap.org/book/osdetect.html ,它們都不太容易看懂,我是文檔和源碼交互著看了幾十遍才大概明白整個流程。
基本原理
Nmap OS 指紋識別通過向目標機器的Open和Close 端口 發送多達 16 個 TCP、UDP 和 ICMP 探針來工作
其中 TCP探針13個,UDP探針 1 個,ICMP探針2個。
這些探針是根據RFC協議 中的各種歧義來設計的。然后 Nmap 監聽響應。分析響應中的數十個屬性以生成124 個指紋,并和nmap內置的指紋庫進行對比。
nmap對操作系統識別的代碼大多集中在 osscan.cc osscan2.cc中。
- osscan.cc:主要負責os指紋的解析、對比函數,可直接看如下的函數定義。
/* Parses a single fingerprint from the memory region given.  If a
 non-null fingerprint is returned, the user is in charge of freeing it
 when done.  This function does not require the fingerprint to be 100%
 complete since it is used by scripts such as scripts/fingerwatch for
 which some partial fingerprints are OK. */
FingerPrint *parse_single_fingerprint(const char *fprint_orig);

/* These functions take a file/db name and open+parse it, returning an
   (allocated) FingerPrintDB containing the results.  They exit with
   an error message in the case of error. */
FingerPrintDB *parse_fingerprint_file(const char *fname);

/* Compares 2 fingerprints -- a referenceFP (can have expression
   attributes) with an observed fingerprint (no expressions).  If
   verbose is nonzero, differences will be printed.  The comparison
   accuracy (between 0 and 1) is returned).  MatchPoints is
   a special "fingerprints" which tells how many points each test is worth. */
double compare_fingerprints(const FingerPrint *referenceFP, const FingerPrint *observedFP,
                            const FingerPrintDef *MatchPoints, int verbose);
- osscan2.cc:主要負責發送探針以及根據返回內容生成指紋,下面是定義的一些主要函數,send開頭為相關探針的發送函數,process為中間處理指紋函數,make為最終生成指紋函數。
  /* Probe send functions. */
  void sendTSeqProbe(HostOsScanStats *hss, int probeNo);
  void sendTOpsProbe(HostOsScanStats *hss, int probeNo);
  void sendTEcnProbe(HostOsScanStats *hss);
  void sendT1_7Probe(HostOsScanStats *hss, int probeNo);
  void sendTUdpProbe(HostOsScanStats *hss, int probeNo);
  void sendTIcmpProbe(HostOsScanStats *hss, int probeNo);
  /* Response process functions. */
  bool processTSeqResp(HostOsScanStats *hss, const struct ip *ip, int replyNo);
  bool processTOpsResp(HostOsScanStats *hss, const struct tcp_hdr *tcp, int replyNo);
  bool processTWinResp(HostOsScanStats *hss, const struct tcp_hdr *tcp, int replyNo);
  bool processTEcnResp(HostOsScanStats *hss, const struct ip *ip);
  bool processT1_7Resp(HostOsScanStats *hss, const struct ip *ip, int replyNo);
  bool processTUdpResp(HostOsScanStats *hss, const struct ip *ip);
  bool processTIcmpResp(HostOsScanStats *hss, const struct ip *ip, int replyNo);

  /* Generic sending functions used by the above probe functions. */
  int send_tcp_probe(HostOsScanStats *hss,
                     int ttl, bool df, u8* ipopt, int ipoptlen,
                     u16 sport, u16 dport, u32 seq, u32 ack,
                     u8 reserved, u8 flags, u16 window, u16 urp,
                     u8 *options, int optlen,
                     char *data, u16 datalen);
  int send_icmp_echo_probe(HostOsScanStats *hss,
                           u8 tos, bool df, u8 pcode,
                           unsigned short id, u16 seq, u16 datalen);
  int send_closedudp_probe(HostOsScanStats *hss,
                           int ttl, u16 sport, u16 dport);

  void makeTSeqFP(HostOsScanStats *hss);
  void makeTOpsFP(HostOsScanStats *hss);
  void makeTWinFP(HostOsScanStats *hss);
nmap將指紋分為以下幾類
- SEQ:基于探針進行序列分析的指紋結果
- OPS:基于探針接受到的TCP選項
- WIN:基于探針接受到的響應窗口大小 (TCP Windows Size)
- T系列:基于探針響應的TCP數據包各種測試值的結果
- ECN:ECN探針返回結果
- ECN 是一種通過允許路由器在開始不得不丟棄數據包之前發出擁塞問題信號來提高 Internet 性能的方法。它記錄在RFC 3168中.
- 當生成許多包通過路由器時會導致其負載變大,這稱之為擁塞。其結果就是系統會變慢以降低擁堵,以便路由器不會發生丟包。這個包僅為了得到目標系統的響應而發送。因為不同的操作系統以不同的方式處理這個包,所以返回的特定值可以用來判斷操作系統。
- IE:ICMP響應的數據包測試值結果
- U1:UDP響應的數據包測試值結果
nmap OS探測時,會向目標主機的一個Open狀態TCP端口,一個Close狀態TCP端口,一個關閉的UDP端口 發送數據包,以及一個ICMP數據包。
nmap發包函數是os_scan_ipv4,可以通過源碼看發包流程
/* Performs the OS detection for IPv4 hosts. This method should not be called
 * directly. os_scan() should be used instead, as it handles chunking so
 * you don't do too many targets in parallel */
int OSScan::os_scan_ipv4(std::vector &Targets) {
  ...

  /* Initialize the pcap session handler in HOS */
  begin_sniffer(&HOS, Targets);

  ...
  // 準備測試,刪除舊信息,初始化變量
  startRound(&OSI, &HOS, itry);
  // 執行順序產生測試(發送6個TCP探測包,每隔100ms一個)
  doSeqTests(&OSI, &HOS);
  // 執行TCP、UDP、ICMP探測包測試
  doTUITests(&OSI, &HOS);
  // 對結果做指紋對比,獲取OS掃描信息
  endRound(&OSI, &HOS, itry);
  // 將超時未匹配的主機移動
  expireUnmatchedHosts(&OSI, &unMatchedHosts);
  }
TCP探針
TCP將發送13個數據包,這些數據包分為三類,一類是對tcp option的測試,一類是對tcp/ip 其他字段的測試,最后是ECN測試。
可以直接看nmap構造tcp option數據包源碼
/* 8 options:
 *  0~5: six options for SEQ/OPS/WIN/T1 probes.
 *  6:   ECN probe.
 *  7-12:   T2~T7 probes.
 *
 * option 0: WScale (10), Nop, MSS (1460), Timestamp, SackP
 * option 1: MSS (1400), WScale (0), SackP, T(0xFFFFFFFF,0x0), EOL
 * option 2: T(0xFFFFFFFF, 0x0), Nop, Nop, WScale (5), Nop, MSS (640)
 * option 3: SackP, T(0xFFFFFFFF,0x0), WScale (10), EOL
 * option 4: MSS (536), SackP, T(0xFFFFFFFF,0x0), WScale (10), EOL
 * option 5: MSS (265), SackP, T(0xFFFFFFFF,0x0)
 * option 6: WScale (10), Nop, MSS (1460), SackP, Nop, Nop
 * option 7-11: WScale (10), Nop, MSS (265), T(0xFFFFFFFF,0x0), SackP
 * option 12: WScale (15), Nop, MSS (265), T(0xFFFFFFFF,0x0), SackP
 */
static struct {
  u8* val;
  int len;
} prbOpts[] = {
  {(u8*) "\x03\x03\x0A\x01\x02\x04\x05\xb4\x08\x0A\xff\xff\xff\xff\x00\x00\x00\x00\x04\x02", 20},
  {(u8*) "\x02\x04\x05\x78\x03\x03\x00\x04\x02\x08\x0A\xff\xff\xff\xff\x00\x00\x00\x00\x00", 20},
  {(u8*) "\x08\x0A\xff\xff\xff\xff\x00\x00\x00\x00\x01\x01\x03\x03\x05\x01\x02\x04\x02\x80", 20},
  {(u8*) "\x04\x02\x08\x0A\xff\xff\xff\xff\x00\x00\x00\x00\x03\x03\x0A\x00", 16},
  {(u8*) "\x02\x04\x02\x18\x04\x02\x08\x0A\xff\xff\xff\xff\x00\x00\x00\x00\x03\x03\x0A\x00", 20},
  {(u8*) "\x02\x04\x01\x09\x04\x02\x08\x0A\xff\xff\xff\xff\x00\x00\x00\x00", 16},
  {(u8*) "\x03\x03\x0A\x01\x02\x04\x05\xb4\x04\x02\x01\x01", 12},
  {(u8*) "\x03\x03\x0A\x01\x02\x04\x01\x09\x08\x0A\xff\xff\xff\xff\x00\x00\x00\x00\x04\x02", 20},
  {(u8*) "\x03\x03\x0A\x01\x02\x04\x01\x09\x08\x0A\xff\xff\xff\xff\x00\x00\x00\x00\x04\x02", 20},
  {(u8*) "\x03\x03\x0A\x01\x02\x04\x01\x09\x08\x0A\xff\xff\xff\xff\x00\x00\x00\x00\x04\x02", 20},
  {(u8*) "\x03\x03\x0A\x01\x02\x04\x01\x09\x08\x0A\xff\xff\xff\xff\x00\x00\x00\x00\x04\x02", 20},
  {(u8*) "\x03\x03\x0A\x01\x02\x04\x01\x09\x08\x0A\xff\xff\xff\xff\x00\x00\x00\x00\x04\x02", 20},
  {(u8*) "\x03\x03\x0f\x01\x02\x04\x01\x09\x08\x0A\xff\xff\xff\xff\x00\x00\x00\x00\x04\x02", 20}
};
發包每次的TCP Windows窗口大小也不一樣
/* TCP Window sizes. Numbering is the same as for prbOpts[] */
u16 prbWindowSz[] = { 1, 63, 4, 4, 16, 512, 3, 128, 256, 1024, 31337, 32768, 65535 };
前六個數據包為 SEQ/OPS/WIN/T1 探針,第7個為ECN探針,后面的是T探針。
SEQ/OPS/WIN探針發SYN包,ECN探針發 TH_CWR|TH_ECE|TH_SYN,Urgent為63477,T探針發包flag如下,發包端口前四個為開放的tcp端口,后三個為關閉的TCP端口。
如果nmap未找到關閉的TCP端口,將隨機取值
closedTCPPort = (get_random_uint() % 14781) + 30000;
TflagDst PortT1TH_SYNopenTCPPortT20openTCPPortT3TH_SYN|TH_FIN|TH_URG|TH_PUSHopenTCPPortT4TH_ACKopenTCPPortT5TH_SYNclosedTCPPortT6TH_ACKclosedTCPPortT7TH_FIN|TH_PUSH|TH_URGclosedTCPPort
ICMP探針
發送兩個 ICMP 探針。
第一個設置 IP協議 DF 位,TOS 為零,ICMP Code字段為 9(即ICMPv4CodeNetAdminProhibited),Seq為 295,payload 120 字節的 0x00。
第二個 探針類似ping 查詢,除了 TOS設置為IP_TOS_RELIABILITY,ICMP Code為0(ICMPv4CodeNet),發送 150 字節的數據。
UDP探針
向一個關閉的UDP端口發包,IP協議的ID設置為0x1042,payload為300字節的0x43
如果nmap未找到關閉的UDP端口,將隨機取值
closedUDPPort = (get_random_uint() % 14781) + 30000;
指紋生成
這是造輪子過程中最麻煩的部分,需要將這些指紋結果一一實現。
TCP ISN 最大公約數 ( GCD)
tcp前六個探測包中,tcp seq數值的差值作為一個數組,這個數組及有5個元素。取這個數組的最大公約數。
TCP ISN 計數器速率 ( ISR)
取探針返回包 SEQ的差 除以 發送時間的毫秒差 即 SEQ的發送速率,再得出探針每個速率的平均值即seq_rate,最后通過一個公式得出最后的值即ISR。
seq_rate = log(seq_rate) / log(2.0);
seq_rate = (unsigned int) (seq_rate * 8 + 0.5);
TCP ISN 序列可預測性指數 ( SP)
代碼和文檔都難懂,弄一個簡化版的代碼就看懂了
seq_stddev = 0
for i =0;i-1;i++{
  seq_stddev += ((SEQ[i]的發送速率 - SEQ平均速率)  / GCD 最大公約數)的平方
}
seq_stddev  /= responseNum-2
seq_stddev = sqrt(seq_stddev);
seq_stddev = log(seq_stddev) / log(2.0);
sp = (int) (seq_stddev * 8 + 0.5);
以我僅學過的線性代數,這個可以弄成一個公式的,但是我不會在markdown上展示,算了~
IP ID序列生成算法( TI, CI, II)
從TCP Open端口,Tcp Close端口,ICMP協議中,計算ip id的生成算法
- 如果所有 ID 號均為零,則測試值為
Z。 - 如果 IP ID 序列至少增加 20,000,則該值為
RD(隨機)。這個結果是不可能的,II因為沒有足夠的樣本來支持它。 - 如果所有 IP ID 都相同,則測試設置為該十六進制值。
- 如果兩個連續 ID 之間的任何差異超過 1,000,并且不能被 256 整除,則測試的值為
RI(隨機正增量)。如果差異可以被 256 整除,則它必須至少為 256,000 才能導致此RI結果。 - 如果所有差異都可以被 256 整除且不大于 5,120,則測試設置為
BI(中斷增量)。 這種情況發生在 Microsoft Windows 等系統上,其中 IP ID 以主機字節順序而不是網絡字節順序發送。它工作正常并且沒有任何類型的 RFC 違規,盡管它確實泄露了對攻擊者有用的主機架構細節。 - 如果所有差異都小于十,則該值為
I(增量)。我們在這里允許最多 10 個差異(而不是要求按順序排列),因為來自其他主機的流量會導致序列間隙。 - 如果前面的步驟都沒有識別生成算法,則從指紋中省略測試。
共享 IP ID 序列布爾值 ( SS)
根據前面推測出的IP ID增長方式,記錄目標是否在 TCP 和 ICMP 協議之間共享其 IP ID 序列。
 /* SS: Shared IP ID sequence boolean */
  if ((tcp_ipid_seqclass == IPID_SEQ_INCR ||
        tcp_ipid_seqclass == IPID_SEQ_BROKEN_INCR ||
        tcp_ipid_seqclass == IPID_SEQ_RPI) &&
       (icmp_ipid_seqclass == IPID_SEQ_INCR ||
        icmp_ipid_seqclass == IPID_SEQ_BROKEN_INCR ||
        icmp_ipid_seqclass == IPID_SEQ_RPI)) {
    /* Both are incremental. Thus we have "SS" test. Check if they
       are in the same sequence. */
    u32 avg = (hss->ipid.tcp_ipids[good_tcp_ipid_num - 1] - hss->ipid.tcp_ipids[0]) / (good_tcp_ipid_num - 1);
    if (hss->ipid.icmp_ipids[0] < hss->ipid.tcp_ipids[good_tcp_ipid_num - 1] + 3 * avg) {
      test.setAVal("SS", "S");
    } else {
      test.setAVal("SS", "O");
    }
  }
TCP 時間戳選項算法 ( TS)
這個能預測出開機時間!
TS是另一個測試,它試圖 根據它如何生成一系列數字來確定目標操作系統的特征。這個查看響應SEQ探測的 TCP 時間戳選項(如果有)。它檢查 TSval(選項的前四個字節)而不是回顯的 TSecr(最后四個字節)值。它采用每個連續 TSval 之間的差異,并將其除以 Nmap 發送生成這些響應的兩個探測器之間經過的時間量。
結果值給出了每秒時間戳增量的速率。Nmap 計算所有連續探測的平均每秒增量,然后計算TS如下:
- 如果任何響應沒有時間戳選項,
TS則設置為U(不支持)。 - 如果任何時間戳值為零,
TS則設置為0。 - 如果每秒平均增量在、 或 范圍內
0-5.66,則分別設置為 1、7 或 8。這三個范圍得到特殊處理,因為它們對應于許多主機使用的 2 Hz、100 Hz 和 200 Hz 頻率。70-150``150-350``TS - 在所有其他情況下,Nmap 記錄每秒平均增量的二進制對數,四舍五入到最接近的整數。由于大多數主機使用 1,000 Hz 頻率,
A這是一個常見的結果。
這個結果可以推斷出開機時間
/* Now we look at TCP Timestamp sequence prediction */
  /* Battle plan:
     1) Compute average increments per second, and variance in incr. per second
     2) If any are 0, set to constant
     3) If variance is high, set to random incr. [ skip for now ]
     4) if ~10/second, set to appropriate thing
     5) Same with ~100/sec
  */
  if (hss->si.ts_seqclass == TS_SEQ_UNKNOWN && hss->si.responses >= 2) {
    time_t uptime = 0;
    avg_ts_hz = 0.0;
    for (i = 0; i < hss->si.responses - 1; i++) {
      double dhz;

      dhz = (double) ts_diffs[i] / (time_usec_diffs[i] / 1000000.0);
      /*       printf("ts incremented by %d in %li usec -- %fHZ", ts_diffs[i], time_usec_diffs[i], dhz); */
      avg_ts_hz += dhz / (hss->si.responses - 1);
    }

    if (avg_ts_hz > 0 && avg_ts_hz < 5.66) { /* relatively wide range because sampling time so short and frequency so slow */
      hss->si.ts_seqclass = TS_SEQ_2HZ;
      uptime = hss->si.timestamps[0] / 2;
    }
    else if (avg_ts_hz > 70 && avg_ts_hz < 150) {
      hss->si.ts_seqclass = TS_SEQ_100HZ;
      uptime = hss->si.timestamps[0] / 100;
    }
    else if (avg_ts_hz > 724 && avg_ts_hz < 1448) {
      hss->si.ts_seqclass = TS_SEQ_1000HZ;
      uptime = hss->si.timestamps[0] / 1000;
    }
    else if (avg_ts_hz > 0) {
      hss->si.ts_seqclass = TS_SEQ_OTHER_NUM;
      uptime = hss->si.timestamps[0] / (unsigned int)(0.5 + avg_ts_hz);
    }

    if (uptime > 63072000) {
      /* Up 2 years?  Perhaps, but they're probably lying. */
      if (o.debugging) {
        /* long long is probably excessive for number of days, but sick of
         * truncation warnings and finding the right format string for time_t
         */
        log_write(LOG_STDOUT, "Ignoring claimed %s uptime of %lld days",
        hss->target->targetipstr(), (long long) (uptime / 86400));
      }
      uptime = 0;
    }
    hss->si.lastboot = hss->seq_send_times[0].tv_sec - uptime;
  }


switch (hss->si.ts_seqclass) {

  case TS_SEQ_ZERO:
    test.setAVal("TS", "0");
    break;
  case TS_SEQ_2HZ:
  case TS_SEQ_100HZ:
  case TS_SEQ_1000HZ:
  case TS_SEQ_OTHER_NUM:
    /* Here we "cheat" a little to make the classes correspond more
       closely to common real-life frequencies (particularly 100)
       which aren't powers of two. */
    if (avg_ts_hz <= 5.66) {
      /* 1 would normally range from 1.4 - 2.82, but we expand that
         to 0 - 5.66, so we won't ever even get a value of 2.  Needs
         to be wide because our test is so fast that it is hard to
         match slow frequencies exactly.  */
      tsnewval = 1;
    } else if (avg_ts_hz > 70 && avg_ts_hz <= 150) {
      /* mathematically 7 would be 90.51 - 181, but we change to 70-150 to
         better align with common freq 100 */
      tsnewval = 7;
    } else if (avg_ts_hz > 150 && avg_ts_hz <= 350) {
      /* would normally be 181 - 362.  Now aligns better with 200 */
      tsnewval = 8;
    } else {
      /* Do a log base2 rounded to nearest int */
      tsnewval = (unsigned int)(0.5 + log(avg_ts_hz) / log(2.0));
    }

    test.setAVal("TS", hss->target->FPR->cp_hex(tsnewval));
    break;
  case TS_SEQ_UNSUPPORTED:
    test.setAVal("TS", "U");
    break;
  }
TCP 選項 ( O, O1–O6)
TCP 數據包的Options。指紋保留了原始順序,以及選項的值。有些操作系統沒有實現這些選項或者實現不全。
Option NameCharacterArgument (if any)End of Options List (EOL)L No operation (NOP)N Maximum Segment Size (MSS)MThe value is appended. Many systems echo the value used in the corresponding probe.Window Scale (WS)WThe actual value is appended.Timestamp (TS)TThe T is followed by two binary characters representing the TSval and TSecr values respectively. The characters are 0 if the field is zero and 1 otherwise.Selective ACK permitted (SACK)S |
int HostOsScan::get_tcpopt_string(const struct tcp_hdr *tcp, int mss, char *result, int maxlen) const {
  char *p;
  const char *q;
  u16 tmpshort;
  u32 tmpword;
  int length;
  int opcode;

  p = result;
  length = (tcp->th_off * 4) - sizeof(struct tcp_hdr);
  q = ((char *)tcp) + sizeof(struct tcp_hdr);

  /*
   * Example parsed result: M5B4ST11NW2
   *   MSS, Sack Permitted, Timestamp with both value not zero, Nop, WScale with value 2
   */

  /* Be aware of the max increment value for p in parsing,
   * now is 5 = strlen("Mxxxx") <-> MSS Option
   */
  while (length > 0 && (p - result) < (maxlen - 5)) {
    opcode = *q++;
    if (!opcode) { /* End of List */
      *p++ = 'L';
      length--;
    } else if (opcode == 1) { /* No Op */
      *p++ = 'N';
      length--;
    } else if (opcode == 2) { /* MSS */
      if (length < 4)
        break; /* MSS has 4 bytes */
      *p++ = 'M';
      q++;
      memcpy(&tmpshort, q, 2);
      /*  if (ntohs(tmpshort) == mss) */
      /*    *p++ = 'E'; */
      sprintf(p, "%hX", ntohs(tmpshort));
      p += strlen(p); /* max movement of p is 4 (0xFFFF) */
      q += 2;
      length -= 4;
    } else if (opcode == 3) { /* Window Scale */
      if (length < 3)
        break; /* Window Scale option has 3 bytes */
      *p++ = 'W';
      q++;
      snprintf(p, length, "%hhX", *((u8*)q));
      p += strlen(p); /* max movement of p is 2 (max WScale value is 0xFF) */
      q++;
      length -= 3;
    } else if (opcode == 4) { /* SACK permitted */
      if (length < 2)
        break; /* SACK permitted option has 2 bytes */
      *p++ = 'S';
      q++;
      length -= 2;
    } else if (opcode == 8) { /* Timestamp */
      if (length < 10)
        break; /* Timestamp option has 10 bytes */
      *p++ = 'T';
      q++;
      memcpy(&tmpword, q, 4);
      if (tmpword)
        *p++ = '1';
      else
        *p++ = '0';
      q += 4;
      memcpy(&tmpword, q, 4);
      if (tmpword)
        *p++ = '1';
      else
        *p++ = '0';
      q += 4;
      length -= 10;
    }
  }

  if (length > 0) {
    /* We could reach here for one of the two reasons:
     *  1. At least one option is not correct. (Eg. Should have 4 bytes but only has 3 bytes left).
     *  2. The option string is too long.
     */
    *result = '\0';
    return -1;
  }

  *p = '\0';
  return p - result;
}
TCP 初始窗口大小 ( W, W1– W6)
TCP.Windows
響應度 ( R)
記錄目標是否響應給定的探測。可能的值為Y和N。如果沒有回復,則省略測試的其余字段。
有返回包為Y,否則為N
IP 不分片位 ( DF)
#define IP_DF 0x4000 /* don't fragment flag */
IP.Flag && IP_DF
不要分段 (ICMP) ( DFI)
兩個ICMP請求中計算 IP.Flag && IP_DF
- 都為真則為Y
- 一真一假則為S
- 都為假為N
- 否則為0
IP 初始生存時間 ( T)
IP.TTL
IP 初始生存時間猜測 ( TG)
根據ttl算tg
int get_initial_ttl_guess(u8 ttl) {
  if (ttl <= 32)
    return 32;
  else if (ttl <= 64)
    return 64;
  else if (ttl <= 128)
    return 128;
  else
    return 255;
}
顯式擁塞通知 ( CC)
此測試僅用于ECN探頭。該探測是一個 SYN 數據包,其中包括 CWR 和 ECE 擁塞控制標志。當接收到響應 SYN/ACK 時,檢查這些標志以設置CC(擁塞控制)測試值
  /* Explicit Congestion Notification support test */
  if ((tcp->th_flags & TH_ECE) && (tcp->th_flags & TH_CWR))
    /* echo back */
    test.setAVal("CC", "S");
  else if (tcp->th_flags & TH_ECE)
    /* support */
    test.setAVal("CC", "Y");
  else if (!(tcp->th_flags & TH_CWR))
    /* not support */
    test.setAVal("CC", "N");
  else
    test.setAVal("CC", "O");
TCP 雜項怪癖 ( Q)
一些tcp怪癖 (俺也不知道現在還有用沒)
 /* TCP miscellaneous quirks test */
  p = quirks_buf;
  if (tcp->th_x2) {
    /* Reserved field of TCP is not zero */
    assert(p + 1 < quirks_buf + sizeof(quirks_buf));
    *p++ = 'R';
  }
  if (!(tcp->th_flags & TH_URG) && tcp->th_urp) {
    /* URG pointer value when urg flag not set */
    assert(p + 1 < quirks_buf + sizeof(quirks_buf));
    *p++ = 'U';
  }
  *p = '\0';
  test.setAVal("Q", hss->target->FPR->cp_dup(quirks_buf, p - quirks_buf));
TCP 序列號 ( S)
測試返回包中tcp.seq和發送時tcp.ack的關系
 /* Seq test values:
     Z   = zero
     A   = same as ack
     A+  = ack + 1
     O   = other
  */
  if (ntohl(tcp->th_seq) == 0)
    test.setAVal("S", "Z");
  else if (ntohl(tcp->th_seq) == tcpAck)
    test.setAVal("S", "A");
  else if (ntohl(tcp->th_seq) == tcpAck + 1)
    test.setAVal("S", "A+");
  else
    test.setAVal("S", "O");
TCP 確認號 ( A)
  /* ACK test values:
     Z   = zero
     S   = same as syn
     S+  = syn + 1
     O   = other
  */
  if (ntohl(tcp->th_ack) == 0)
    test.setAVal("A", "Z");
  else if (ntohl(tcp->th_ack) == tcpSeqBase)
    test.setAVal("A", "S");
  else if (ntohl(tcp->th_ack) == tcpSeqBase + 1)
    test.setAVal("A", "S+");
  else
    test.setAVal("A", "O");
TCP 標志 ( F)
 /* Flags. They must be in this order:
     E = ECN Echo
     U = Urgent
     A = Acknowledgement
     P = Push
     R = Reset
     S = Synchronize
     F = Final
  */
  struct {
    u8 flag;
    char c;
  } flag_defs[] = {
    { TH_ECE, 'E' },
    { TH_URG, 'U' },
    { TH_ACK, 'A' },
    { TH_PUSH, 'P' },
    { TH_RST, 'R' },
    { TH_SYN, 'S' },
    { TH_FIN, 'F' },
  };
  assert(sizeof(flag_defs) / sizeof(flag_defs[0]) < sizeof(flags_buf));
  p = flags_buf;
  for (i = 0; i < (int) (sizeof(flag_defs) / sizeof(flag_defs[0])); i++) {
    if (tcp->th_flags & flag_defs[i].flag)
      *p++ = flag_defs[i].c;
  }
  *p = '\0';
  test.setAVal("F", hss->target->FPR->cp_dup(flags_buf, p - flags_buf));
TCP RST 數據校驗和 ( RD)
 /* Rst Data CRC32 */
  length = (int) ntohs(ip->ip_len) - 4 * ip->ip_hl -4 * tcp->th_off;
  if ((tcp->th_flags & TH_RST) && length>0) {
    test.setAVal("RD", hss->target->FPR->cp_hex(nbase_crc32(((u8 *)tcp) + 4 * tcp->th_off, length)));
  } else {
    test.setAVal("RD", "0");
  }
IP總長( IPL)
ip.length
未使用的端口不可達字段非零 ( UN)
IP字段中 ID和SEQ字段整體的 uin32位數值
返回的探測 IP 總長度值 ( RIPL)
UDP測試中,對icmp返回包中ip結構的長度校驗,返回長度的十六進制
  /* OK, lets check the returned IP length, some systems @$@ this
     up */
  if (ntohs(ip2->ip_len) == 328)
    test.setAVal("RIPL", "G");
  else
    test.setAVal("RIPL", hss->target->FPR->cp_hex(ntohs(ip2->ip_len)));
返回的探針 IP ID 值 ( RID)
UDP測試中,對icmp返回包中ip結構的id校驗
  /* Now lets see how they treated the ID we sent ... */
  if (ntohs(ip2->ip_id) == hss->upi.ipid)
    test.setAVal("RID", "G"); /* The good "expected" value */
  else
    test.setAVal("RID", hss->target->FPR->cp_hex(ntohs(ip2->ip_id)));
返回的探測 IP 校驗和值的完整性 ( RIPCK)
UDP測試中,對icmp返回包中ip完整性校驗
  /* Let us see if the IP checksum we got back computes */

  /* Thanks to some machines not having struct ip member ip_sum we
     have to go with this BS */
  checksumptr = (unsigned short *)   ((char *) ip2 + 10);
  checksum = *checksumptr;

  if (checksum == 0) {
    test.setAVal("RIPCK", "Z");
  } else {
    *checksumptr = 0;
    if (in_cksum((unsigned short *)ip2, 20) == checksum) {
      test.setAVal("RIPCK", "G"); /* The "expected" good value */
    } else {
      test.setAVal("RIPCK", "I"); /* They modified it */
    }
    *checksumptr = checksum;
  }
返回的探測 UDP 校驗和的完整性 ( RUCK)
  /* UDP checksum */
  if (udp->uh_sum == hss->upi.udpck)
    test.setAVal("RUCK", "G"); /* The "expected" good value */
  else
    test.setAVal("RUCK", hss->target->FPR->cp_hex(ntohs(udp->uh_sum)));
返回的 UDP 數據的完整性 ( RUD)
  /* Finally we ensure the data is OK */
  datastart = ((unsigned char *)udp) + 8;
  dataend = (unsigned char *)  ip + ntohs(ip->ip_len);

  while (datastart < dataend) {
    if (*datastart != hss->upi.patternbyte)
      break;
    datastart++;
  }
  if (datastart < dataend)
    test.setAVal("RUD", "I"); /* They modified it */
  else
    test.setAVal("RUD", "G");
ICMP 響應代碼 ( CD)
  /* ICMP Code value. Test values:
   * [Value]. Both set Code to the same value [Value];
   * S. Both use the Code that the sender uses;
   * O. Other.
   */
  value1 = icmp1->icmp_code;
  value2 = icmp2->icmp_code;
  if (value1 == value2) {
    if (value1 == 0)
      test.setAVal("CD", "Z");
    else
      test.setAVal("CD", hss->target->FPR->cp_hex(value1));
  }
  else if (value1 == 9 && value2 == 0)
    /* both the same as in the corresponding probe */
    test.setAVal("CD", "S");
  else
    test.setAVal("CD", "O");
指紋匹配
nmap os指紋文件在https://github.com/nmap/nmap/blob/master/nmap-os-db
nmap指紋解析
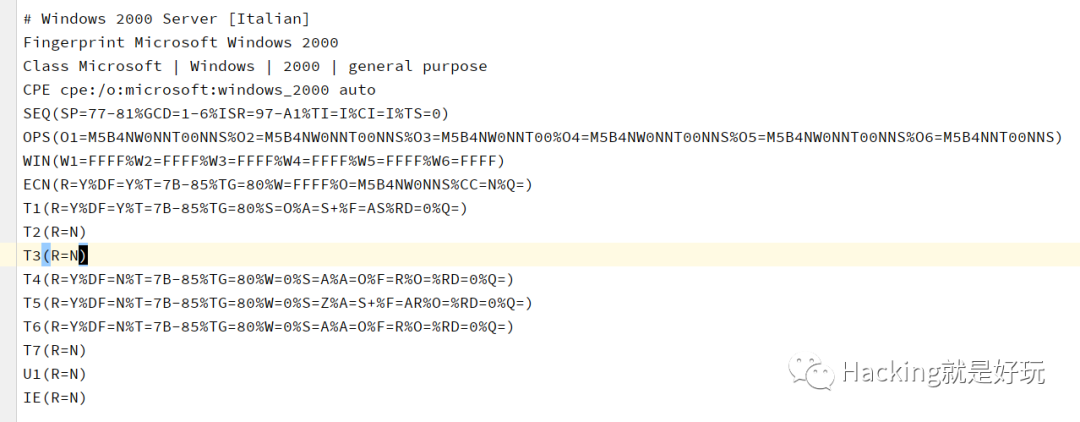
Fingerprint關鍵字定義一個新的指紋,緊隨其后的是指紋名字。
Class行用于指定該指紋所屬的類別,依次指定該系統的vendor(生產廠家),OS family(系統類別),OS generation(第幾代操作系統),and device type(設備類型)。
接下來是CPE行,此行非常重要,使用CPE(CommonPlatformEnumeration,通用平臺枚舉)格式描述該系統的信息。以標準的CPE格式來描述操作系統類型,便于Nmap與外界信息的交換,比如可以很快從網上開源數據庫查找到CPE描述的操作系統具體信息。
剩下SEQ OPS WIN 等等即各類指紋類型。
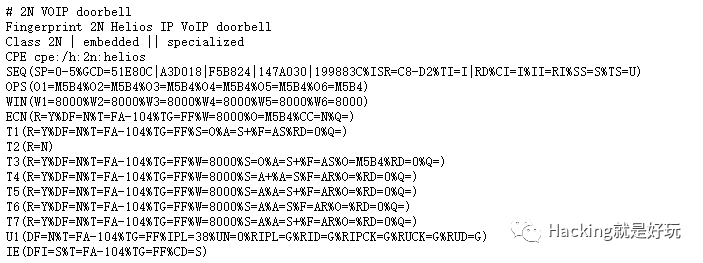
表達式
指紋可以是表達式類型的,nmap支持的表達式
- 大于:>
- 小于:<
- 范圍: 1-3
- 或關系: GCD=1-6|64|256
指紋解析代碼
nmap的指紋解析在parse_fingerprint_file函數。通過遍歷每一行,和#開頭的跳過,Fingerprint開頭則創建新指紋,Class ,CPE開頭即新指紋的屬性,發現(、)字符即新的指紋內容。
精簡后的代碼如下
FingerPrintDB *parse_fingerprint_file(const char *fname) {

  fp = fopen(fname, "r");

top:
  while (fgets(line, sizeof(line), fp)) {
    lineno++;
    /* Read in a record */
    // 換行 和 # 開頭的跳過
    if (*line == '' || *line == '#')
      continue;

fparse:
    if (strncmp(line, "Fingerprint", 11) == 0) {
      // 指紋的開始行,創建新指紋
      current = new FingerPrint;
    } else if (strncmp(line, "MatchPoints", 11) == 0) {
      // 這是MatchPoint
    } else {
      error("Parse error on line %d of nmap-os-db file: %s", lineno, line);
      continue;
    }

    DB->prints.push_back(current);

    p = line + 12;
    while (*p && isspace((int) (unsigned char) *p))
      p++;

    q = strpbrk(p, "#");
    while (isspace((int) (unsigned char) *(--q)));

    current->match.OS_name = cp_strndup(p, q - p + 1); // 當前指紋os name
    current->match.line = lineno; // 當前指紋行數

    /* Now we read the fingerprint itself */
    while (fgets(line, sizeof(line), fp)) {
      lineno++;
      if (*line == '#')
        continue;
      if (*line == '')
        break;

      q = strchr(line, '');

      if (0 == strncmp(line, "Fingerprint ",12)) {
        goto fparse;
      } else if (strncmp(line, "Class ", 6) == 0) {
        parse_classline(current, line, q, lineno);
      } else if (strncmp(line, "CPE ", 4) == 0) {
        parse_cpeline(current, line, q, lineno);
      } else {
        p = line;
        q = strchr(line, '(');
        FingerTest test(FPstr(p, q), *DB->MatchPoints);
        p = q+1;
        q = strchr(p, ')');
        if (!test.str2AVal(p, q)) {
          error("Parse error on line %d of nmap-os-db file: %s", lineno, line);
          goto top;
        }
        current->setTest(test);
      }
    }
  }

  fclose(fp);
  return DB;
}
指紋匹配算法
指紋的第一行有個叫MatchPoints的東東,它不是指紋,它定義了指紋的權重
# This first element provides the number of points every fingerprint
# test is worth.  Tests like TTL or Don't fragment are worth less
# (insectionidually) because there are so many of them and the values are
# often correlated with each other.  Meanwhile, elements such as TS
# (TCP timestamp) which are only used once, get more points.  Points
# are used when there are no perfect matches to determine which OS
# fingerprint matches a target machine most closely.
MatchPoints
SEQ(SP=25%GCD=75%ISR=25%TI=100%CI=50%II=100%SS=80%TS=100)
OPS(O1=20%O2=20%O3=20%O4=20%O5=20%O6=20)
WIN(W1=15%W2=15%W3=15%W4=15%W5=15%W6=15)
ECN(R=100%DF=20%T=15%TG=15%W=15%O=15%CC=100%Q=20)
T1(R=100%DF=20%T=15%TG=15%S=20%A=20%F=30%RD=20%Q=20)
T2(R=80%DF=20%T=15%TG=15%W=25%S=20%A=20%F=30%O=10%RD=20%Q=20)
T3(R=80%DF=20%T=15%TG=15%W=25%S=20%A=20%F=30%O=10%RD=20%Q=20)
T4(R=100%DF=20%T=15%TG=15%W=25%S=20%A=20%F=30%O=10%RD=20%Q=20)
T5(R=100%DF=20%T=15%TG=15%W=25%S=20%A=20%F=30%O=10%RD=20%Q=20)
T6(R=100%DF=20%T=15%TG=15%W=25%S=20%A=20%F=30%O=10%RD=20%Q=20)
T7(R=80%DF=20%T=15%TG=15%W=25%S=20%A=20%F=30%O=10%RD=20%Q=20)
U1(R=50%DF=20%T=15%TG=15%IPL=100%UN=100%RIPL=100%RID=100%RIPCK=100%RUCK=100%RUD=100)
IE(R=50%DFI=40%T=15%TG=15%CD=100)
nmap通過逐行對比指紋,指紋正確加上權重的分數,最后對每個指紋計算一個概率,即 成功分數/總數,輸出概率高的指紋。
nmap默認的概率閾值是0.85,即概率小于這個數,則認為指紋不準確了。
表達式解析
具體的指紋匹配函數,包含解析表達式。val是掃描生成的指紋數值,expr是內置OS庫中指紋數值。
- 用
|分割expr,分別比對,比對成功直接返回 true - 將val轉為數字,如果val 是數字,就根據邏輯比對
<>-符號 - 對于其他結果,就直接對比 val和expr的文本即可。
/* Compare an observed value (e.g. "45") against an OS DB expression (e.g.
   "3B-47" or "8|A" or ">10"). Return true iff there's a match. The syntax uses
     < (less than)
     > (greater than)
     | (or)
     - (range)
   No parentheses are allowed. */
static bool expr_match(const char *val, const char *expr) {
  const char *p, *q, *q1;  /* OHHHH YEEEAAAAAHHHH!#!@#$!% */
  char *endptr;
  unsigned int val_num, expr_num, expr_num1;
  bool is_numeric;

  p = expr;

  val_num = strtol(val, &endptr, 16);
  is_numeric = !*endptr;
  // TODO: this could be a lot faster if we compiled fingerprints to a bytecode
  // instead of re-parsing every time.
  do {
    q = strchr(p, '|');
    if (is_numeric && (*p == '<' || *p == '>')) {
      expr_num = strtol(p + 1, &endptr, 16);
      if (endptr == q || !*endptr) {
        if ((*p == '<' && val_num < expr_num)
            || (*p == '>' && val_num > expr_num)) {
          return true;
        }
      }
    } else if (is_numeric && ((q1 = strchr(p, '-')) != NULL)) {
      expr_num = strtol(p, &endptr, 16);
      if (endptr == q1) {
        expr_num1 = strtol(q1 + 1, &endptr, 16);
        if (endptr == q || !*endptr) {
          assert(expr_num1 > expr_num);
          if (val_num >= expr_num && val_num <= expr_num1) {
            return true;
          }
        }
      }
    } else {
      if ((q && !strncmp(p, val, q - p)) || (!q && !strcmp(p, val))) {
        return true;
      }
    }
    if (q)
      p = q + 1;
  } while (q);

  return false;
}
用Golang造輪子
上述只是原理,真正寫代碼調試的時候會遇到更多困難。為什么我發的包和nmap不一樣,為什么指紋計算的結果和nmap不一樣,為什么指紋匹配不到。有幾個小技巧可以緩解一下這些問題。
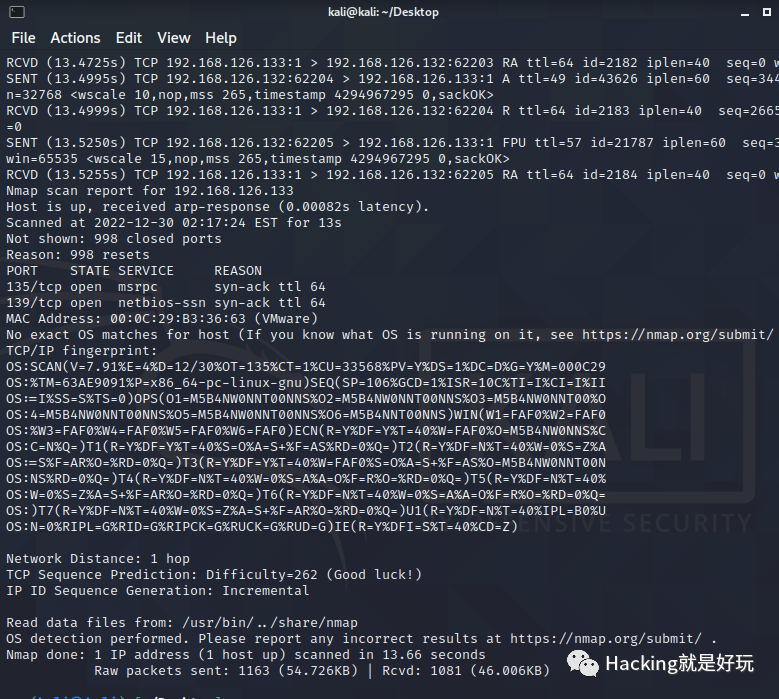
nmap 有個參數可以顯示發送的包 --packet-trace,再將-vv 詳細輸出打開,事先找好Open和Close的TCP端口,用以下命令
nmap -p80,20 --packet-trace -vv -O 123.123.123.123
能看到具體發送的包和返回的包

以及最終輸出的指紋
發包和收包用的是 https://github.com/google/gopacket
它基于libpcap,支持多個系統,并且可以發原始數據包。之前寫過 https://github.com/boy-hack/ksubdomain ,所以對這個庫也很熟悉。
nmap也是基于libpcap發包的。
數據鏈路層
因為這個包太底層,以至于要自己組裝協議,數據鏈路層,網絡層,傳輸層,都要自己組裝。
對于數據鏈路層,需要知道自己的網卡Mac以及目標網卡Mac,對于外網,目標網卡就是路由器的Mac,對于內網,目標網卡就是arp探測到的mac。
在ksubdomain中,我用了一個取巧的方式,我先調用系統的nslookup去請求一個地址,然后監聽返回包,返回包中會包含數據鏈路層,直接拿來用即可。
這次我采用一個古老又復雜的方法,是 https://github.com/v-byte-cpu/sx 這個項目提供的靈感,但它也沒有很好實現。
- 先確定目標IP
- 調用系統路由表,確定目標IP該使用的網卡,此時就能獲得本地網卡的mac地址和網關IP。
- 調用系統arp緩存,查找目標ip是否有,如果有,就能獲得目標地址的網卡mac(無論是內網主機的mac還是網卡的mac,緩存中都有)
- 如果系統arp緩存沒有找到,則使用arp協議,像內網段廣播獲得網關的mac,如果目標IP是同一個網段,則廣播查找目標IP的Mac。
其他
其他部分暫時沒有踩坑,按照nmap源碼的實現來就行了。
