海蓮花glitch樣本去混淆
去混淆思路
奇安信的報告《使用和海蓮花相似混淆手法的攻擊樣本分析》[1]中分析了一個和APT32使用相同混淆方法的樣本。本文根據奇安信的報告以及報告中提到的參考文章和代碼[2]對該樣本進行去混淆。
SHA256:bf3e495f43a6b333b10ae69667304cfd2c87e9100de9d31365671c7b6b93132e
如下圖所示,cmp/test指令將數據段中存儲的數據與立即數進行比較,下一條指令是條件跳轉指令,根據比較結果來決定是否發生跳轉。惡意代碼通過這種方式來混淆控制流,影響分析人員進行逆向分析。
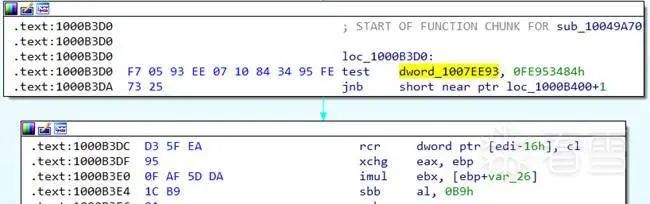
圖 1-1 混淆代碼
解決方法:
如果條件跳轉指令不執行,將cmp/test +條件跳轉指令替換成NOP指令。
如果條件跳轉指令執行,將cmp/test到跳轉地址之間的指令替換成NOP指令。
該dll當前載入的基址是0x10000000,與立即數(operation_2)進行比較的數據存儲在地址operation_1(0x1007EE93),如果dll載入基址發生變化,則operation_1也會相應發生變化。為了使dll在基址發生改變時也能正確獲取數據,使用dword_1007EE93的地址被記錄在了重定位表中,當基址發生變化時,程序會根據重定位表中的地址修改operation_1。重定位表中保存了一大堆需要修正的代碼的地址。
我們可以獲取重定位表中存儲的地址信息,通過判斷該地址前面的指令是否為cmp/test來確定混淆指令的地址。模擬執行cmp/test、跳轉指令后獲取之后執行的指令地址。通過判斷是否發生了跳轉,將對應指令替換成NOP。
代碼結構
2.1 獲取重定位表中存儲的需要修正的代碼地址
使用python的pefile庫獲取重定位表中存儲的RVA。
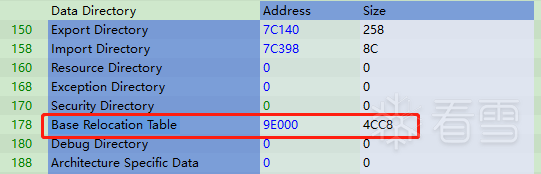
圖 2-1 重定位表
reloc_table_num = pefile.DIRECTORY_ENTRY['IMAGE_DIRECTORY_ENTRY_BASERELOC'] # 獲取重定位表的VirtualAddress和Size reloc_table = pe.OPTIONAL_HEADER.DATA_DIRECTORY[reloc_table_num] reloc_table_rva = reloc_table.VirtualAddress reloc_table_size = reloc_table.Size print(f'重定位表RAV:{reloc_table_rva:#x},重定位表大小:{reloc_table_size:#x}')
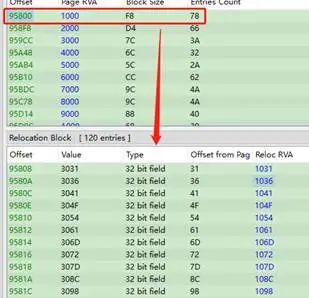
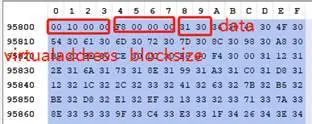
重定位表由數個IMAGE_BASE_RELOCATION結構組成,每個結構由VirutalAddress(DWORD)、SizeOfBlock(DWORD)和TypeOffset(SizeOfBlock-8)組成。重定位數據2個字節一組,高4位是類型,低12位是地址。低12位加上VirutalAddress是RVA。以第一個數據0x3031為例,低12位是0x031,加上0x1000,是0x1031。
relocations = pe.parse_relocations_directory(reloc_table_rva, reloc_table_size) reloc_data_rva = [] for i in relocations: for j in i.entries: # print(f'重定位數據RVA:{j.rva:#x}') reloc_data_rva.append(j.rva)
parse_relocations_directory返回BaseRelocationData對象列表。BaseRelocationData有兩個屬性,struct和entries。struct是IMAGE_BASE_RELOCATION結構的VA和Size。entries是RelocationData對象列表,每一個RelocationData包含type和RVA,RVA是低12位加上VirutalAddress后的值。
class BaseRelocationData(DataContainer): """Holds base relocation information. struct: IMAGE_BASE_RELOCATION structure entries: list of relocation data (RelocationData instances) """ class RelocationData(DataContainer): """Holds relocation information. type: Type of relocation The type string can be obtained by RELOCATION_TYPE[type] rva: RVA of the relocation """

圖 2-2 BaseRelocationData的struct和RelocationData對象列表
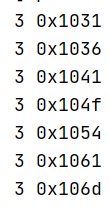
圖 2-3 重定位數據的RVA
reloc_data_rva列表中存儲所有重定位數據RVA。
2.2 獲取混淆指令所在地址
本部分代碼引用自
https://github.com/levanvn/APT32_Deobfuscate/blob/master/Type2/Script/Type2_Deobfuscate.py
混淆指令有以下5種情況。


圖 2-4 混淆指令
在默認操作數是32 位的OS 上,任何操作word 的指令都較操作dword 的指令長一個字節(Prefixes 0x66)。操作數前面的機器碼長度是2到3字節。從使用重定位數據的地址往前3個字節或2個字節進行匯編,判斷指令是否為cmp/test和跳轉指令,如果是就獲取到了混淆指令所在地址。
設置初值b為3,獲取數據,如果往前3個字節開頭是0x66,b減1,判斷匯編代碼,符合條件返回地址, reloc_data_rva - b – 1。如果開頭不是0x66,b減1,判斷往前2個字節的匯編代碼,符合條件返回地址。
branch = ["JZ", "JP", "JO", "JS", "JG", "JB", "JA", "JL", "JE", "JNZ", "JNP", "JNO", "JNS", "JLE", "JNB", "JBE", "JGE", "JNE", "JAE"] b = 3 for i in range(3): code = memory_data[reloc_data_rva - b: reloc_data_rva - b + 40] if b == 3 and code[0] != 0x66: b = b - 1 continue b = b - 1 try: ins = md.disasm(code, ImageBase + reloc_data_rva-b-1) ins_1 = next(ins) ins_2 = next(ins) ins.close() except StopIteration: continue if (ins_1.mnemonic == 'cmp' or ins_1.mnemonic == 'test') and ins_2.mnemonic.upper() in branch \ and len(ins_1.operands) == 2 and ins_1.operands[0].type == X86_OP_MEM and ins_1.operands[1].type == X86_OP_IMM: return return ins_1.address-0x10000000 return 0
2.3 模擬執行混淆指令
2.3.1 將文件映射到內存中
PE文件頭中的FileAlignment定義了磁盤區塊的對齊值,SectionAlignment定義了內存中區塊的內存值。每一個區塊從對齊值的倍數的偏移位置開始。

圖 2-5 對齊值
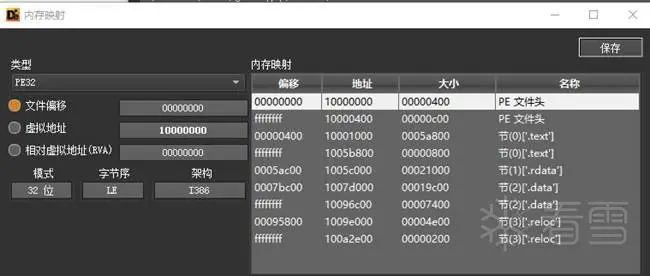
圖 2-6 文件映射到內存中的地址
pefile庫中的函數get_memory_mapped_image()可以返回與PE文件的內存布局對應的數據
pe = pefile.PE(filename, fast_load=True) content = pe.get_memory_mapped_image() mu.mem_write(0x10000000, pe.get_memory_mapped_image())
2.3.2 定義hook_code函數
獲取到混淆指令所在地址后,模擬執行3條指令,cmp/test、跳轉指令和第3條指令,記錄第3條指令的地址。
使用count對執行的指令進行計數,將count存儲在esp寄存器中。如果執行完3條指令,則記錄第3條指令地址,退出模擬執行。
instruction_3 = [] def hook_code(mu, address, size, userdata): print(f'>>> Tracing instruction at {address:#x}, instruction size = {size:#x}') r_esp = mu.reg_read(UC_X86_REG_ESP) count = u32(mu.mem_read(r_esp + 4, 4)) print(f'count is {count}') if count == 2: instruction_3.append(address) mu.emu_stop() try: exit() except BaseException as e: print(e) count = count + 1 mu.mem_write(r_esp + 4, p32(count)) def simulate_execute(ins_addr_rva): mu.mem_write(r_esp + 4, p32(0)) mu.emu_start(ins_addr_rva + ImageBase, 0x100066E6)
2.3.3 調用函數獲取跳轉結果
跳轉結果存儲在instruction_3列表中。
reloc_data_rva = get_reloc_data_rva(pe) for rva in reloc_data_rva: ins_addr_rva = get_intruction_start_rva(memory_mapped_image, rva, ImageBase) if ins_addr_rva != 0: simulate_execute(ins_addr_rva)
2.4 根據是否跳轉執行替換相應指令
假設所有混淆指令的執行結果都是不跳轉,通過順序執行ins_3 = next(ins)的方式獲取第3條指令的地址。將獲取到的地址與模擬執行結果instruction_3列表中的地址進行比較,如果相等,則并未發生跳轉,如果不相等則發生了跳轉。順序執行時有的地址無法進行匯編,將地址值賦值為0。
# 獲取按順序執行時第3條指令地址 code = memory_mapped_image[ins_addr_rva:ins_addr_rva+40] ins = md.disasm(code, ImageBase + ins_addr_rva) ins_1 = next(ins) ins_2 = next(ins) try: ins_3 = next(ins) ins_3_address = ins_3.address except: ins_3_address = 0 ins.close()
未發生跳轉則將混淆指令test/cmp + 跳轉指令賦值為0x90,發生跳轉,則將混淆指令與目的跳轉地址中間的數據全部賦值為0x90,中間的數據是垃圾數據,如果只將js等指令替換成“jmp 目的地址”,會影響程序的反匯編。
if instruction_3[count] == ins_3_address: size = ins_1.size + ins_2.size assembly = b'\x90' * size patch(memory_mapped_image, ImageBase, ImageBase + ins_addr_rva, assembly) else: size = instruction_3[count] - ins_1.address assembly = b'\x90' * size patch(memory_mapped_image, ImageBase, ImageBase + ins_addr_rva, assembly) count = count + 1
2.5 修復文件
使用函數set_bytes_at_rva(rva, data)修改PE 映像中的數據,并寫入文件。
for section in pe.sections: print(f'{section.Name}, VirtualAddress: {section.VirtualAddress:#x}, ' f'Size: {section.SizeOfRawData:#x}, 文件偏移: {section.PointerToRawData:#x}') pe.set_bytes_at_rva(section.VirtualAddress, bytes(memory_mapped_image[section.VirtualAddress:section.VirtualAddress + section.SizeOfRawData])) print('[+] Save to file ' + '1.bin') pe.write('1.bin')
完整代碼
# _*_ coding: utf-8 _*_ import pefile import struct from capstone.x86 import * from capstone import * from unicorn import * from unicorn.x86_const import * from binascii import * def u32(data): return struct.unpack("I", data)[0] def p32(num): return struct.pack("I", num) def patch(image, image_base, address, patch_data): ''' :param image: memory_mapped_image 從入口點開始處的數據 :param image_base: 基址 :param address: imagebase+rva VA :param patch_data: :return: ''' i = 0 for b in patch_data: image[address - image_base + i] = b i += 1 # 獲取重定位表的序號 pefile.py 146行 def get_reloc_data_rva(pefile_struct): ''' :param pefile_struct: :return: 返回所有重定位數據的RVA列表 ''' reloc_table_num = pefile.DIRECTORY_ENTRY['IMAGE_DIRECTORY_ENTRY_BASERELOC'] # 獲取重定位表的VirtualAddress和Size reloc_table = pe.OPTIONAL_HEADER.DATA_DIRECTORY[reloc_table_num] reloc_table_rva = reloc_table.VirtualAddress reloc_table_size = reloc_table.Size print(f'重定位表RAV:{reloc_table_rva:#x},重定位表大小:{reloc_table_size:#x}') # reloc_table由數個IMAGE_BASE_RELOCATION結構組成,每個結構由VirutalAddress(DWORD)、SizeOfBlock(DWORD)和TypeOffset(SizeOfBlock-8)組成 # parse_relocations_directory返回BaseRelocationData對象列表 relocations = pe.parse_relocations_directory(reloc_table_rva, reloc_table_size) # 獲取所有的重定位數據RVA reloc_data_rva = [] for i in relocations: # BaseRelocationData有兩個屬性,struct和entries。 # struct是IMAGE_BASE_RELOCATION結構的VA和Size。 # entries: list of relocation data (RelocationData instances) # RelocationData: type和RVA # print(i.struct) for j in i.entries: reloc_data_rva.append(j.rva) return reloc_data_rva def get_intruction_start_rva(memory_data, reloc_data_rva, ImageBase): ''' :param memory_data: 映射到內存中的文件數據 :param reloc_data_rva: 重定位數據的rva :param ImageBase: ImageBase :return: 指令的rva ''' branch = ["JZ", "JP", "JO", "JS", "JG", "JB", "JA", "JL", "JE", "JNZ", "JNP", "JNO", "JNS", "JLE", "JNB", "JBE", "JGE", "JNE", "JAE"] b = 3 for i in range(3): code = memory_data[reloc_data_rva - b: reloc_data_rva - b + 40] if b == 3 and code[0] != 0x66: b = b - 1 continue b = b - 1 try: ins = md.disasm(code, ImageBase + reloc_data_rva-b-1) ins_1 = next(ins) ins_2 = next(ins) ins.close() except StopIteration: continue if (ins_1.mnemonic == 'cmp' or ins_1.mnemonic == 'test') and ins_2.mnemonic.upper() in branch \ and len(ins_1.operands) == 2 and ins_1.operands[0].type == X86_OP_MEM and ins_1.operands[ 1].type == X86_OP_IMM: return ins_1.address-0x10000000 return 0 filename = 'bf3e495f43a6b333b10ae69667304cfd2c87e9100de9d31365671c7b6b93132e' pe = pefile.PE(filename, fast_load=True) memory_mapped_image = bytearray(pe.get_memory_mapped_image()) ImageBase = pe.OPTIONAL_HEADER.ImageBase print('[+] Map PE') BASE = 0x10000000 STACK_ADDR = 0x400000 STACK_SIZE = 1024 * 1024 mu = Uc(UC_ARCH_X86, UC_MODE_32) mu.mem_map(BASE, 1024 * 1024) mu.mem_map(STACK_ADDR, STACK_SIZE) r_esp = STACK_ADDR + STACK_SIZE // 2 mu.reg_write(UC_X86_REG_ESP, STACK_ADDR + STACK_SIZE // 2) # 將文件映射到內存中 mu.mem_write(0x10000000,pe.get_memory_mapped_image()) md = Cs(CS_ARCH_X86, CS_MODE_32) md.detail = True instruction_3 = [] def hook_code(mu, address, size, userdata): print(f'>>> Tracing instruction at {address:#x}, instruction size = {size:#x}') r_esp = mu.reg_read(UC_X86_REG_ESP) count = u32(mu.mem_read(r_esp + 4, 4)) print(f'count is {count}') if count == 2: instruction_3.append(address) mu.emu_stop() try: exit() except BaseException as e: print(e) count = count + 1 mu.mem_write(r_esp + 4, p32(count)) mu.hook_add(UC_HOOK_CODE, hook_code) def simulate_execute(ins_addr_rva): mu.mem_write(r_esp + 4, p32(0)) mu.emu_start(ins_addr_rva + ImageBase, 0x100066E6) reloc_data_rva = get_reloc_data_rva(pe) ins_addr_rva_all = [] count = 0 for rva in reloc_data_rva: ins_addr_rva = get_intruction_start_rva(memory_mapped_image, rva, ImageBase) if ins_addr_rva != 0: ins_addr_rva_all.append(ins_addr_rva) simulate_execute(ins_addr_rva) # 獲取按順序執行時第3條指令地址 code = memory_mapped_image[ins_addr_rva:ins_addr_rva+40] ins = md.disasm(code, ImageBase + ins_addr_rva) ins_1 = next(ins) ins_2 = next(ins) try: ins_3 = next(ins) ins_3_address = ins_3.address except: ins_3_address = 0 ins.close() if instruction_3[count] == ins_3_address: size = ins_1.size + ins_2.size assembly = b'\x90' * size patch(memory_mapped_image, ImageBase, ImageBase + ins_addr_rva, assembly) else: size = instruction_3[count] - ins_1.address assembly = b'\x90' * size patch(memory_mapped_image, ImageBase, ImageBase + ins_addr_rva, assembly) count = count + 1 for section in pe.sections: print(f'{section.Name}, VirtualAddress: {section.VirtualAddress:#x}, ' f'Size: {section.SizeOfRawData:#x}, 文件偏移: {section.PointerToRawData:#x}') pe.set_bytes_at_rva(section.VirtualAddress, bytes(memory_mapped_image[section.VirtualAddress:section.VirtualAddress + section.SizeOfRawData])) print('[+] Save to file ' + '1.bin') pe.write('1.bin')
